Python
- Fundamentals Review
- Basic Python
- Data Types
- Loops
- Container Comprehension
- Recursion
- Data Structures
- Basics Cheatsheet
- Serialization Formats
- Style Guides
- Documentation Practices
- Pathlib
- Functions
- Advance Review
- Debugging
- Coding Interview Patterns
- Getting Started
- Big O
- Brute Force
- Hashmap
- Cycle Sort
- Two Pointers
- Sliding Window
- Getting Started part2
- Object Oriented Programming
- Object Oriented Basics
- Encapsulation
- Abstraction
- Inheritance
- Polymorphism
- Built-in Methods
- Class Creation: Getter/Setter vs Property
- Object Oriented Design Patterns
- Object Oriented Design Interviews
- Packaging and Wheels
Fundamentals Review
Basic Python
https://neetcode.io/courses/lessons/python-for-coding-interviews
Variables
# Variables are dynamicly typed
n = 0
print('n =', n)
>>> n = 0
n = "abc"
print('n =', n)
>>> n = abc
# Multiple assignments
n, m = 0, "abc"
n, m, z = 0.125, "abc", False
# Increment
n = n + 1 # good
n += 1 # good
n++ # bad
# None is null (absence of value)
n = 4
n = None
print("n =", n)
>>> n = None
If-statements
# If statements don't need parentheses
# or curly braces.
n = 1
if n > 2:
n -= 1
elif n == 2:
n *= 2
else:
n += 2
# Parentheses needed for multi-line conditions.
# and = &&
# or = ||
n, m = 1, 2
if ((n > 2 and
n != m) or n == m):
n += 1
Loops
n = 5
while n < 5:
print(n)
n += 1
# Looping from i = 0 to i = 4
for i in range(5):
print(i)
# Looping from i = 2 to i = 5
for i in range(2, 6):
print(i)
# Looping from i = 5 to i = 2
for i in range(5, 1, -1):
print(i)
Math
# Division is decimal by default
print(5 / 2)
# Double slash rounds down
print(5 // 2)
# CAREFUL: most languages round towards 0 by default
# So negative numbers will round down
print(-3 // 2)
# A workaround for rounding towards zero
# is to use decimal division and then convert to int.
print(int(-3 / 2))
# Modding is similar to most languages
print(10 % 3)
# Except for negative values
print(-10 % 3)
# To be consistent with other languages modulo
import math
from multiprocessing import heap
print(math.fmod(-10, 3))
# More math helpers
print(math.floor(3 / 2))
print(math.ceil(3 / 2))
print(math.sqrt(2))
print(math.pow(2, 3))
# Max / Min Int
float("inf")
float("-inf")
# Python numbers are infinite so they never overflow
print(math.pow(2, 200))
# But still less than infinity
print(math.pow(2, 200) < float("inf"))
Arrays
# Arrays (called lists in python)
arr = [1, 2, 3]
print(arr)
#output: [1, 2, 3]
# Can be used as a stack. .pop takes off end of list, .insert adds to beginning
arr.append(4)
arr.append(5)
print(arr)
#output: [1, 2, 3, 4, 5]
num = arr.pop()
print(num)
#output: 5
print(arr)
#output: [1, 2, 3, 4]
arr.insert(1, 7)
print(arr)
#output: [1, 7, 2, 3, 4]
arr[0] = 0
arr[3] = 0
print(arr)
# Initialize arr of size n with default value of 1
n = 5
arr = [1] * n
print(arr)
print(len(arr))
# Careful: -1 is not out of bounds, it's the last value
arr = [1, 2, 3]
print(arr[-1])
#Output: 3
# Indexing -2 is the second to last value, etc.
print(arr[-2])
#Output: 2
# Sublists (aka slicing)
arr = [1, 2, 3, 4]
print(arr[1:3])
# output: [2, 3] be aware that index starts at 0 in array and last index is non-inclusive
# Similar to for-loop ranges, last index is non-inclusive
print(arr[0:4])
# But no out of bounds error. Easy to make mistake if no error, be aware
print(arr[0:10])
# output: [2, 3, 4] returns the final values as well if outside of index
# Unpacking
a, b, c = [1, 2, 3]
print(a, b, c)
# Be careful though
# a, b = [1, 2, 3]
# Loop through arrays
nums = [1, 2, 3]
# Using index
for i in range(len(nums)):
print(f'index i:{i}, nums[i]:{nums[i]}')
#output:
#index i:0, nums[i]:1
#index i:1, nums[i]:2
#index i:2, nums[i]:3
# Without index
for n in nums:
print(n)
# With index and value
for i, n in enumerate(nums):
print(i, n)
#output:
#index i:0, nums[i]:1
#index i:1, nums[i]:2
#index i:2, nums[i]:3
# Loop through multiple arrays simultaneously with unpacking
nums1 = [1, 3, 5]
nums2 = [2, 4, 6]
for n1, n2 in zip(nums1, nums2):
print(n1, n2)
# Reverse
nums = [1, 2, 3]
nums.reverse()
print(nums)
# Sorting
arr = [5, 4, 7, 3, 8]
arr.sort()
print(arr)
arr.sort(reverse=True)
print(arr)
arr = ["bob", "alice", "jane", "doe"]
arr.sort()
print(arr)
# Custom sort (by length of string)
arr.sort(key=lambda x: len(x))
print(arr)
# List comprehension
arr = [i for i in range(5)]
print(arr)
# 2-D lists
arr = [[0] * 4 for i in range(4)]
print(arr)
print(arr[0][0], arr[3][3])
# This won't work
# arr = [[0] * 4] * 4
Strings
# Strings are similar to arrays
s = "abc"
print(s[0:2])
# But they are immutable
# s[0] = "A"
# So this creates a new string
s += "def"
print(s)
# Valid numeric strings can be converted
print(int("123") + int("123"))
# And numbers can be converted to strings
print(str(123) + str(123))
# In rare cases you may need the ASCII value of a char
print(ord("a"))
print(ord("b"))
# Combine a list of strings (with an empty string delimitor)
strings = ["ab", "cd", "ef"]
print("".join(strings))
Queues
# Queues (double ended queue)
from collections import deque
queue = deque()
queue.append(1)
queue.append(2)
print(queue)
queue.popleft()
print(queue)
queue.appendleft(1)
print(queue)
queue.pop()
print(queue)
HashSets
# HashSet
mySet = set()
mySet.add(1)
mySet.add(2)
print(mySet)
print(len(mySet))
print(1 in mySet)
print(2 in mySet)
print(3 in mySet)
mySet.remove(2)
print(2 in mySet)
# list to set
print(set([1, 2, 3]))
# Set comprehension
mySet = { i for i in range(5) }
print(mySet)
HashMaps
# HashMap (aka dict)
myMap = {}
myMap["alice"] = 88
myMap["bob"] = 77
print(myMap)
print(len(myMap))
myMap["alice"] = 80
print(myMap["alice"])
print("alice" in myMap)
myMap.pop("alice")
print("alice" in myMap)
myMap = { "alice": 90, "bob": 70 }
print(myMap)
# Dict comprehension
myMap = { i: 2*i for i in range(3) }
print(myMap)
# Looping through maps
myMap = { "alice": 90, "bob": 70 }
for key in myMap:
print(key, myMap[key])
for val in myMap.values():
print(val)
for key, val in myMap.items():
print(key, val)
Tuples
# Tuples are like arrays but immutable
tup = (1, 2, 3)
print(tup)
print(tup[0])
print(tup[-1])
# Can't modify
# tup[0] = 0
# Can be used as key for hash map/set
myMap = { (1,2): 3 }
print(myMap[(1,2)])
mySet = set()
mySet.add((1, 2))
print((1, 2) in mySet)
# Lists can't be keys
# myMap[[3, 4]] = 5
Heaps
import heapq
# under the hood are arrays
minHeap = []
heapq.heappush(minHeap, 3)
heapq.heappush(minHeap, 2)
heapq.heappush(minHeap, 4)
# Min is always at index 0
print(minHeap[0])
while len(minHeap):
print(heapq.heappop(minHeap))
# No max heaps by default, work around is
# to use min heap and multiply by -1 when push & pop.
maxHeap = []
heapq.heappush(maxHeap, -3)
heapq.heappush(maxHeap, -2)
heapq.heappush(maxHeap, -4)
# Max is always at index 0
print(-1 * maxHeap[0])
while len(maxHeap):
print(-1 * heapq.heappop(maxHeap))
# Build heap from initial values
arr = [2, 1, 8, 4, 5]
heapq.heapify(arr)
while arr:
print(heapq.heappop(arr))
Functions
def myFunc(n, m):
return n * m
print(myFunc(3, 4))
# Nested functions have access to outer variables
def outer(a, b):
c = "c"
def inner():
return a + b + c
return inner()
print(outer("a", "b"))
# Can modify objects but not reassign
# unless using nonlocal keyword
def double(arr, val):
def helper():
# Modifying array works
for i, n in enumerate(arr):
arr[i] *= 2
# will only modify val in the helper scope
# val *= 2
# this will modify val outside helper scope
nonlocal val
val *= 2
helper()
print(arr, val)
nums = [1, 2]
val = 3
double(nums, val)
Classes
class MyClass:
# Constructor
def __init__(self, nums):
# Create member variables
self.nums = nums
self.size = len(nums)
# self key word required as param
def getLength(self):
return self.size
def getDoubleLength(self):
return 2 * self.getLength()
myObj = MyClass([1, 2, 3])
print(myObj.getLength())
print(myObj.getDoubleLength())
Data Types
Built-in Data Types
In programming, data type is an important concept.
Variables can store data of different types, and different types can do different things.
Python has the following data types built-in by default, in these categories:
| Text Type: | str |
| Numeric Types: | int, float, complex |
| Sequence Types: | list, tuple, range |
| Mapping Type: | dict |
| Set Types: | set, frozenset |
| Boolean Type: | bool |
| Binary Types: | bytes, bytearray, memoryview |
| None Type: | NoneType |
Type Hinting
greeting = "Hello, {}, you're {} years old"
def greet(user: str, age: int) -> str:
return greeting.format(user, age)
name = input("Your name?")
age = int(input("How old are you?"))
print(greet(name, age))
Loops
In Python, there are several loop constructs commonly used for solving array problems. Here are the most common ones:
-
For Loop: The
forloop is widely used for iterating over elements in an array or any iterable object.It allows you to execute a block of code for each element in the array.
arr = [1, 2, 3, 4, 5] for num in array: print(num) -
While Loop:
The
whileloop is used when you need to execute a block of code repeatedly as long as a condition is true.It's often used when you don't know in advance how many iterations are needed.
i = 0 while i < len(array): print(array[i]) i += 1 -
Nested Loops: Nested loops involve placing one loop inside another loop. They are used when you need to iterate over elements of a multi-dimensional array or perform operations that require multiple levels of iteration.
Typically used in brute force solutions where need to compare every permutation.matrix = [[1, 2, 3], [4, 5, 6], [7, 8, 9]] for row in matrix: for num in row: print(num)nums=[1,2,3,4,4] for i in range(len(nums)): # Outer loop iterates over the rows print(f'loop {i}') for j in range(i+1, len(nums)): # Inner loop iterates over the columns print(nums[i],nums[j]) loop 0 1 2 1 3 1 4 1 4 loop 1 2 3 2 4 2 4 loop 2 3 4 3 4 loop 3 4 4 loop 4 -
Enumerate: The
enumerate()function is used to iterate over both the elements and their indices in an array. It returns tuples containing the index and the corresponding element. For example:for i, num in enumerate(arr): print(f"Element at index {i} is {num}") - Range: In Python, the
range()function is used to generate a sequence of numbers. It's commonly used in loops to iterate over a specific range of numbers.- If called with one argument, it generates numbers starting from
0up to (but not including) the specified number. - If called with two arguments, it generates numbers starting from the first argument up to (but not including) the second argument.
- If called with three arguments, it generates numbers starting from the first argument up to (but not including) the second argument, with the specified step size (i.e., the difference between consecutive numbers).
-
-
Generating numbers from 0 to 5 (exclusive):
for i in range(6): print(i) # Output: 0, 1, 2, 3, 4, 5 -
Generating numbers from 2 to 8 (exclusive):
for i in range(2, 9): print(i) # Output: 2, 3, 4, 5, 6, 7, 8 -
Generating numbers from 1 to 10 (exclusive), with a step size of 2:
for i in range(1, 11, 2): print(i) # Output: 1, 3, 5, 7, 9 -
Considering that the end of the range is excluded, when iterating entire array it needs to be -1
for i in range(len(array) - 1): print(i)It's important to note that
range()returns a range object, which is a memory-efficient representation of the sequence of numbers. To actually see the numbers in the sequence, you typically use it within a loop or convert it to a list usinglist(range(...)).
-
- If called with one argument, it generates numbers starting from
Container Comprehension
List Comprehension
Dictionary Comprehension
Recursion
Data Structures
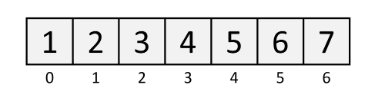
Array

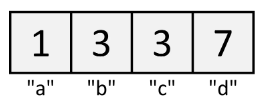
arr = [1, 3, 3, 7]
for val in arr:
# 1,3,3,7
7 in arr # True, takes O(n)
arr[3] # 7
arr[3] = 8
arr.pop() # delete last element
arr.append(9) # insert last element
del arr[1] # delete, takes O(n)
arr.insert(1, 9) # insert, takes O(n)An Array is an ordered list of elements. Each element in an Array exists at an index 0, 1, 2, and so on.
Arrays are called "lists" in Python.
Lists can have duplicate values
Read/Write Time O(1).
Insert/Delete Time O(n).
Hashmap
HashMaps are Arrays, but where you can look up values by string, tuple, number, or other data, called a "key".
HashMaps are called "dictionaries" or "dicts" in Python.
We talk about how to implement a HashMap from scratch here.
h = {} # empty hashmap
h = { # hashmap of the above image
"a": 1,
"b": 3,
"c": 3,
"d": 7
}
# look for a key, and if it doesn't exist, default to 0
h.get("a", 0) # 1
h.get("e", 0) # 0
for key in h:
print(key) # "a" "b" "c" "d"
for k,v in h.items():
print(k) # "a" "b" "c" "d"
print(v) # 1 3 3 7
h["b"] # read value (3)
h["b"] = 9 # write value (9)
del h["b"] # delete value
"a" in h # True, O(1)Keys have to be unique
Read/Write Time O(1).
Insert/Delete Time O(1).
Set
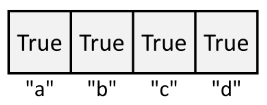
Sets are essentially HashMaps where all the values are True. Python implements them as a new data structure for convenience.
Sets let you quickly determine whether an element is present. Here's the syntax for using a Set.
s = set() # empty set
s = {"a", "b", "c", "d"} # set of the above image
s.add("z") # add to set
s.remove("c") # remove from set
s.pop() # remove and return an element
for val in s:
print(val) # "a" "b" "d" "z"
"z" in s # True, O(1)Read/Write Time O(1).
Add/Remove Time O(1).
Linked List
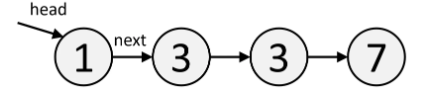
A Linked List is a custom data structure that you implement yourself. The first node in the Linked List is called the "head". Each node has a value val, and points to the next node next.
# create nodes, and change next pointers
head = ListNode(1)
b = ListNode(3)
c = ListNode(3)
d = ListNode(7)
head.next = b
b.next = c
c.next = d
# you can also create the list using the ListNode(val, next) function
head = (
ListNode(1,
ListNode(3,
ListNode(3, ListNode(7))
)
)
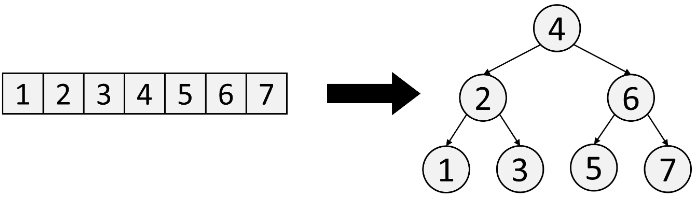
)Tree
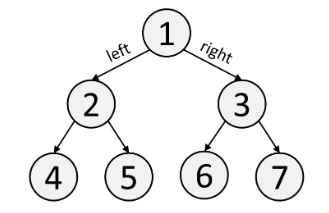
Trees are a custom data structure you implement yourself. Usually, "Tree" means Binary Tree. In a Binary Tree, each node has a value val, a left child left, and a right child right.
# you can create the above tree by creating TreeNode objects
root = TreeNode(1)
l = TreeNode(2)
r = TreeNode(3)
ll = TreeNode(4)
lr = TreeNode(5)
rl = TreeNode(6)
rr = TreeNode(7)
root.left = l
root.right = r
l.left = ll
l.right = lr
r.left = rl
r.right = rr
# an easier way to write that code is to nest TreeNodes
root = TreeNode(1,
TreeNode(2,
TreeNode(4),
TreeNode(5)
),
TreeNode(3,
TreeNode(6),
TreeNode(7)
)
)Trees generally have a height of O(n), but balanced trees are spread wider and have a height of O(log n), which makes reading/writing faster.
Read/Write Time O(n).
Read/Write Time O(log n) for balanced trees like Binary Search Trees and Heaps.
Graph
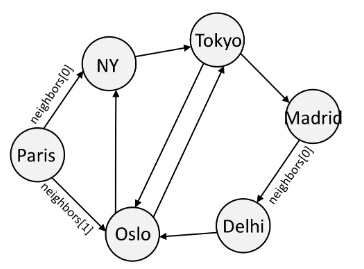
A graph is made of nodes that point to each other.
There are two ways you can store a graph. It doesn't matter which one you pick.
# Option 1: create nodes, and point every node to its neighbors
Paris = Node()
NY = Node()
Tokyo = Node()
Madrid= Node()
Delhi = Node()
Oslo = Node()
Paris.neighbors = [NY, Oslo]
NY.neighbors = [Tokyo]
Tokyo.neighbors = [Madrid, Oslo]
Madrid.neighbors= [Delhi]
Delhi.neighbors = [Oslo]
Oslo.neighbors = [NY, Tokyo]
# Option 2: create an "Adjacency Matrix" that stores all the connections
adjacenyMatrix = {
'Paris': ['NY', 'Oslo'],
'NY': ['Tokyo'],
'Tokyo': ['Madrid', 'Oslo'],
'Madrid':['Delhi'],
'Delhi': ['Oslo'],
'Oslo': ['NY', 'Tokyo'],
}Read/Write Time Varies.
Insert/Delete Time Varies.
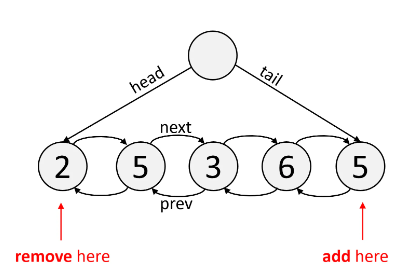
DeQueue (Double-Ended)

A Double-Ended Queue (Deque) is a Linked List that has pointers going both ways, next and prev. It's a built-in data structure, and the syntax is similar to an Array.
The main benefit of Deques is that reading and writing to the ends of a Deque takes O(1) time.
The tradeoff is that reading and writing in general takes O(n) time.
from collections import deque
dq = deque([2, 5, 3, 6, 5])
# These are O(1)
dq.pop() # remove last element
dq.popleft() # remove first element
dq.append("a") # add last element
dq.appendleft("b") # add first element
#These are O(n)
dq[3]
dq[3] = 'c'
for val in dq:
print(val) # 2 5 3 6 5
5 in dq # True, takes O(n)Read/Write Time O(n).
Insert/Delete Time O(n).
Append/Pop Time O(1).
AppendLeft/PopLeft Time O(1).
Queue
A Queue adds elements from one side, and remove elements from the opposite side. This means you remove elements in the order they're added, like a line or "queue" at grocery store. Typically you add to the right and pop from the left.
You can implement a Queue using a Deque, or implement it yourself as a custom data structure.
from collections import deque
q = deque([1, 3, 3, 7])
val = q.popleft() # remove 0th element
print(val) # 1
print(q) # [3, 3, 7]
q.append(5) # add as last element
print(q) # [3, 3, 7, 8, 5]Read/Write Time O(1).
Append/Pop Time O(1).
Sorted Array
A Sorted Array is just an Array whose values are in increasing order.
Sorted Arrays are useful because you can use Binary Search, which takes O(log n) time to search for an element. Here are some built-in Python methods for sorting an Array.
# sorted() creates a new sorted array:
array = sorted([4,7,2,1,3,6,5])
# .sort() modifies the original array:
array2 = [4,7,2,1,3,6,5]
array2.sort()
print(array) # [1,2,3,4,5,6,7]
print(array2) # [1,2,3,4,5,6,7]Python's bisect library contains Binary Search methods you can use, although often you'll have to implement Binary Search yourself in an interview.
Search Time O(log n).
Insert/Delete Time O(n).
Sort Time O(n log n).
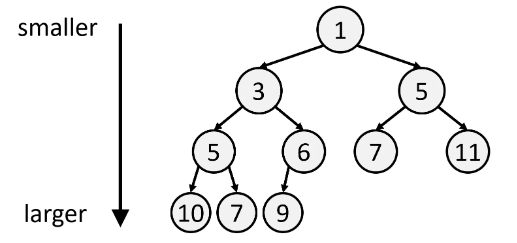
Binary Search Tree
A Binary Search Tree (BST) is just a Sorted Array but in tree form, so that inserting/deleting is faster than if you used a Sorted Array. It's a custom data structure - there is no built-in BST in Python.
Stepping left gives you smaller values, and stepping right gives you larger values. A useful consequence of this is that an inorder traversal visits values in a BST in increasing order.
Search Time O(log n).
Insert/Delete Time O(log n).
Create Time O(n log n).
Heap
A Heap is a Tree, where the values increase as you step downwards.
The purpose of a Heap is to have immediate access to the smallest element.
The smallest element is always at the top. Heaps are always balanced, and they're stored as Arrays in the order of their BFS traversal. We introduced Heaps here.
import heapq
h = [5,4,3,2,1]
heapq.heapify(h) # turns into heap, h=[1,2,3,5,4]
h[0] # find min
heapq.heappop(h) # h=[2,4,3,5]
heapq.heappush(h, 3) # h=[2,3,3,5,4]
h[0] # find minPython only allows Min-Heaps (smallest values on top). If you want a Max-Heap, you can implement it with a Min-Heap by negating all your values when you push and pop.
Read Time O(1).
Push/Pop Time O(log n).
Create Time O(n).
Basics Cheatsheet
Built-in
# primitives
x = 1 # integer
x = 1.2 # float
x = True # bool
x = None # null
x = float('inf') # infinity (float)
# objects
x = [1, 2, 3] # list (Array)
x = (1, 2, 3) # tuple (Immutable Array)
x = {1: "a"} # dict (HashMap)
x = {1, 2, 3} # set
x = "abc123" # str (Immutable String)
Casting
n = 7
str(n) # '7'
int('7') # 7
x = [1,2,3]
set(x) # {1,2,3}
tuple(x) # (1,2,3)
s = {1,2,3}
list(s) # [3,1,2] (sets don't store order)
Basic Operations
a = [1] # array with the number 1 in it
b = [1]
a == b # True, compares value
a is b # False, compares memory location (exact comparison)
1 / 2 # .5 (division)
1 % 2 # 1 (remainder)
1 // 2 # 0 (division, rounding down)
2 ** 5 # 32 (power, 2^5)
Falsy Values
In Python, you can use anything as a boolean. Things that "feel false" like None, 0, and empty data structures evaluate to False.
a = None
b = []
c = [15]
if a:
print('This does not print')
if b:
print('This does not print')
if c:
print('This prints')Loops with range
for i in range(4):
# 0 1 2 3
for i in range(1, 4):
# 1 2 3
for i in range(1, 6, 2): # loop in steps of 2
# 1 3 5
for i in range(3, -1, -1): # loop backwards
# 3 2 1 0
Loops over Data Structures
arr = ["a", "b"]
for x in arr:
# "a" "b"
hmap = {"a": 4, "b": 5}
for x in hmap:
# "a" "b"
List Features
x = [1,2] + [3,4] # [1,2,3,4]
x = [0, 7]*2 # [0,7,0,7], don't use this syntax for 2D arrays
x = [0,1,2,3]
x[2:] # [2,3]
x[:2] # [0,1]
x[1:4] # [1,2,3]
x[3::-1] # [3,2,1,0]
x[-1] # 3
y = reversed(x) # reversed array of x
x.reverse() # reverses x in-place using no extra memory
sorted(x) # sorted array of x
x.sort() # sorts x in-place using no extra memoryList Comprehensions
Python has nice syntax for creating Arrays. Here's an example:
x = [2*n for n in range(4)]
# [0, 2, 4, 6]
x = [a for a in [1,2,3,4,5,6] if a % 2 == 0]
# [2, 4, 6]
# 2 x 3 matrix of zeros
x = [[0 for col in range(3)] for row in range(2)]
# [[0, 0, 0],
# [0, 0, 0]]Here's the general form of list comprehension, and what it's actually doing:
Generator Comprehensions
Generator Comprehensions are List Comprehensions, but they generate values lazily and can stop early. To do a generator comprehension, just use () instead of [].
# stops early if finds True
any(SlowFn(i) for i in range(5))
# does not run the loop yet
computations = (SlowFn(i) for i in range(5))
# runs the loop - might stop early
for x in computations:
if not x:
breakNote that () can mean a tuple, or it can mean a generator. It just depends on context. You can think of Generator Comprehensions as being implemented exactly the same as List Comprehensions, but replacing the word return with yield (you don't have to know about this for an interview).
String Features
# you can use '' or "", there's no difference
x = 'abcde'
y = "abcde"
x[2] # 'c'
for letter in x:
# "a" "b" "c" "d" "e"
x = 'this,is,awesome'
y = x.split(',')
print(y) # ['this', 'is', 'awesome']
x = ['this', 'is', 'awesome']
y = '!'.join(x)
print(y) # 'this!is!awesome'
# convert between character and unicode number
ord("a") # 97
chr(97) # 'a'Set Features
x = {"a", "b", "c"}
y = {"c", "d", "e"}
y = x | y # merge sets, creating a new set {"a", "b", "c", "d", "e"}
Functions
You declare a function using the def keyword:
def my_function():
# do things here
my_function() # runs the code in the functionAll variables you declare inside a function in Python are local. In most cases you need to use nonlocal if you want to set variables outside a function, like below with x and y
x = 1
y = 1
z = [1]
def fn():
nonlocal y
y = 100 # global
x = 100 # local
z[0] = 100 # global (this would normally give an error. to avoid this, python refers to a more globally scoped variable)
fn()
x # 1
y # 100
z[0] # 100Anonymous Functions
You can also declare a function in-line, using the keyword lambda. This is just for convenience. These two statements are both the same function:
def fn(x,y):
return x + y
lambda x,y: x + yBoolean Operators
You can use the any function to check if any value is true, and the all to check if all values are true.
any([True, False, False]) # True
all([True, False, False]) # False
x = [1,2,3]
# checks if any value is equal to 3
any(True if val == 3 else False for val in x) # TrueTernary Operator
Most languages have a "Ternary operator" that gives you a value based on an if statement. Here's Python's:
0 if x == 5 else 1 # gives 0 if x is equal to 5, else gives 1
# Many other languages write this as (x == 5 ? 0 : 1)Newlines
You can write something on multiple lines by escaping the newline, or just using parentheses.
x = 5 \
+ 10 \
+ 6
x = (
5
+ 10
+ 6
)Object Destructuring
You can assign multiple variables at the same time. This is especially useful for swapping variables. Here are a few examples:
# sets a=1, b=2
a,b = 1,2
# sets a=b, b=a, without needing a temporary variable
a,b = b,a
# sets a=1, b=2, c=3, d=4, e=[5, 6]
[a, b, [c, d], e] = [1, 2, [3, 4], [5, 6]]Python Reference
Here's a refrence to the offical Python docs.
https://docs.python.org/3/library/index.html
The Built-in Functions and Built-in Types sections are the most useful parts to skim, although it's totally optional reading. The docs are not formatted in a very readable way.
Serialization Formats
JSON
import json
import requests
def main():
data = {
'username': 'james',
'active': True,
'subscribers': 10,
'order_total': 39.99,
'order_ids': ['ABC123', 'QQQ422', 'LOL300'],
}
print(data)
# printing object as json string
s = json.dumps(data)
print(s)
# getting python object from json string
data2 = json.loads(s)
assert data2 == data
# writing data to file
with open('test_data.json', 'w') as f:
json.dump(data, f)
# reading data from file
with open('test_data.json') as f:
data3 = json.load(f)
assert data3 == data
r = requests.get('https://jsonplaceholder.typicode.com/users')
print(type(r.json()))
if __name__ == '__main__':
main()
Style Guides
Pep8
Google Style Guide
https://google.github.io/styleguide/pyguide.html
Documentation Practices
Pathlib
from os import chdir
from pathlib import Path
def main() -> None:
# current working directory and home directory
cwd = Path.cwd()
home = Path.home()
print(f"Current working directory: {cwd}")
print(f"Home directory: {home}")
# creating paths
path = Path("/usr/bin/python3")
# using backslashes on Windows
path = Path(r"C:\Windows\System32\cmd.exe")
# using forward slash operator
path = Path("/usr") / "bin" / "python3"
# using joinpath
path = Path("/usr").joinpath("bin", "python3")
# reading a file from a path
path = Path.cwd() / "settings.yaml"
with path.open() as file:
print(file.read())
# reading a file from a path using read_text
print(path.read_text())
# resolving a path
path = Path("settings.yaml")
print(path)
full_path = path.resolve()
print(full_path)
# path member variables
print(f"Path: {full_path}")
print(f"Parent: {full_path.parent}")
print(f"Grandparent: {full_path.parent.parent}")
print(f"Name: {full_path.name}")
print(f"Stem: {full_path.stem}")
print(f"Suffix: {full_path.suffix}")
# testing whether a path is a directory or a file
print(f"Is directory: {full_path.is_dir()}")
print(f"Is file: {full_path.is_file()}")
# testing whether a path exists
print(f"Full path exists: {full_path.exists()}")
wrong_path = Path("/usr/does/not/exist")
print(f"Wrong path exists: {wrong_path.exists()}")
# creating a file
new_file = Path.cwd() / "new_file.txt"
new_file.touch()
# writing to a file
new_file.write_text("Hello World!")
# deleting a file
new_file.unlink()
# creating a directory
new_dir = Path.cwd() / "new_dir"
new_dir.mkdir()
# changing to the new directory
chdir(new_dir)
print(f"Current working directory: {Path.cwd()}")
# deleting a directory
new_dir.rmdir()
if __name__ == "__main__":
main()
Functions
Positional and Keyword Arguments
Positional Arguments:
Positional arguments are the most common type of arguments in Python. They are passed to a function in the same order as they are defined in the function's parameter list.
def greet(name, age):
print(f"Hello, {name}! You are {age} years old.")
# Calling the function with positional arguments
greet("Alice", 30)Keyword Arguments:
Keyword arguments are passed to a function with a specific keyword identifier. They do not rely on the order of parameters defined in the function.
def greet(name, age):
print(f"Hello, {name}! You are {age} years old.")
# Calling the function with keyword arguments
greet(age=25, name="Bob")Default Values:
You can also provide default values for function parameters, which allows the function to be called with fewer arguments.
def greet(name="Anonymous", age=18):
print(f"Hello, {name}! You are {age} years old.")
# Calling the function with default values
greet()Mixing Positional and Keyword Arguments:
You can mix positional and keyword arguments in a function call, but positional arguments must come before keyword arguments.
def greet(name, age):
print(f"Hello, {name}! You are {age} years old.")
# Mixing positional and keyword arguments
greet("Charlie", age=35)Understanding these concepts will help you effectively pass arguments to functions in Python, providing flexibility and clarity in your code.
* args
In Python, when * is used as a prefix for a parameter in a function definition, it indicates that the parameter is a variable-length argument list, often referred to as "arbitrary positional arguments" or "varargs". This means that the function can accept any number of positional arguments, and they will be packed into a tuple.
def my_function(*args):
print(args)
my_function(1, 2, 3, 4)
In this example, *args is used to collect all the positional arguments passed to my_function() into a tuple named args. When you call my_function(1, 2, 3, 4), the output will be (1, 2, 3, 4).
You can also combine *args with other regular parameters:
def my_function(a, b, *args):
print("Regular parameters:", a, b)
print("Extra positional arguments:", args)
my_function(1, 2, 3, 4, 5)Here, a and b are regular parameters, while *args collects any additional positional arguments into a tuple.
This feature is particularly useful when you want to create functions that can handle a variable number of arguments, providing flexibility in your code.
Putting * as the first argument force manual typing of the argument when called
def place_order(* ,item, price, quantity)
print(f" {quantity} unitys of {item} at {price} price")
def what_could_go_wrong():
place_order(item="SPX", price=4500, quantity=10000)
Advance Review
Parallel Programming
https://www.youtube.com/watch?v=X7vBbelRXn0
High performance programming
Multiprocessing
Pros
- Separate memory space
- Code is usually straightforward
- Takes advantage of multiple CPUs & cores
- Avoids GIL limitations for cPython
- Eliminates most needs for synchronization primitives unless if you use shared memory (instead, it's more of a communication model for IPC)
- Child processes are interruptible/killable
- Python
multiprocessingmodule includes useful abstractions with an interface much likethreading.Thread - A must with cPython for CPU-bound processing
Cons
- IPC a little more complicated with more overhead (communication model vs. shared memory/objects)
- Larger memory footprint
Example
from __future__ import annotations
import os.path
import time
from multiprocessing import Pool
import numpy as np
import scipy.io.wavfile
def gen_fake_data(filenames):
print("generating fake data")
try:
os.mkdir("sounds")
except FileExistsError:
pass
for filename in filenames: # homework: convert this loop to pool too!
if not os.path.exists(filename):
print(f"creating {filename}")
gen_wav_file(filename, frequency=440, duration=60.0 * 4)
def gen_wav_file(filename: str, frequency: float, duration: float):
samplerate = 44100
t = np.linspace(0., duration, int(duration * samplerate))
data = np.sin(2. * np.pi * frequency * t) * 0.0
scipy.io.wavfile.write(filename, samplerate, data.astype(np.float32))
def etl(filename: str) -> tuple[str, float]:
# extract
start_t = time.perf_counter()
samplerate, data = scipy.io.wavfile.read(filename)
# do some transform
eps = .1
data += np.random.normal(scale=eps, size=len(data))
data = np.clip(data, -1.0, 1.0)
# load (store new form)
new_filename = filename.removesuffix(".wav") + "-transformed.wav"
scipy.io.wavfile.write(new_filename, samplerate, data)
end_t = time.perf_counter()
return filename, end_t - start_t
def etl_demo():
filenames = [f"sounds/example{n}.wav" for n in range(24)]
gen_fake_data(filenames)
start_t = time.perf_counter()
print("starting etl")
with Pool() as pool:
results = pool.map(etl, filenames)
for filename, duration in results:
print(f"{filename} completed in {duration:.2f}s")
end_t = time.perf_counter()
total_duration = end_t - start_t
print(f"etl took {total_duration:.2f}s total")
def run_normal(items, do_work):
print("running normally on 1 cpu")
start_t = time.perf_counter()
results = list(map(do_work, items))
end_t = time.perf_counter()
wall_duration = end_t - start_t
print(f"it took: {wall_duration:.2f}s")
return results
def run_with_mp_map(items, do_work, processes=None, chunksize=None):
print(f"running using multiprocessing with {processes=}, {chunksize=}")
start_t = time.perf_counter()
with Pool(processes=processes) as pool:
results = pool.imap(do_work, items, chunksize=chunksize)
end_t = time.perf_counter()
wall_duration = end_t - start_t
print(f"it took: {wall_duration:.2f}s")
return resultsThreading
Pros
- Lightweight - low memory footprint
- Shared memory - makes access to state from another context easier
- Allows you to easily make responsive UIs
- cPython C extension modules that properly release the GIL will run in parallel
- Great option for I/O-bound applications
Cons
- cPython - subject to the GIL
- Not interruptible/killable
- If not following a command queue/message pump model (using the
Queuemodule), then manual use of synchronization primitives become a necessity (decisions are needed for the granularity of locking) - Code is usually harder to understand and to get right - the potential for race conditions increases dramatically
Asyncio
The Global Interpreter Lock (GIL)
The Global Interpreter Lock (GIL) is a mechanism used in Python to ensure that only one thread executes Python bytecode at a time in a single Python process. This means that, despite having multiple threads, only one thread can execute Python code at any given moment. The GIL prevents race conditions and ensures thread safety by serializing access to Python objects, which helps simplify the implementation of the Python interpreter and makes it easier to write thread-safe Python code.
Key points about the GIL:
-
Concurrency vs. Parallelism: While threads can run concurrently (appear to run simultaneously), they do not run in parallel on multiple CPU cores due to the GIL. This means that multithreading in Python may not always lead to performance improvements for CPU-bound tasks, as only one thread can execute Python bytecode at a time.
-
Impact on I/O-bound Tasks: The GIL has less impact on I/O-bound tasks (tasks that spend a lot of time waiting for input/output operations, such as network requests or file I/O), as threads can overlap their waiting times.
-
Impact on CPU-bound Tasks: For CPU-bound tasks (tasks that require a lot of CPU computation), the GIL can become a bottleneck, limiting the performance gains from using multithreading.
-
Circumventing the GIL: Python's multiprocessing module allows bypassing the GIL by spawning multiple processes instead of threads. Each process has its own Python interpreter and memory space, enabling true parallelism across multiple CPU cores.
-
Trade-offs: While the GIL simplifies memory management and ensures thread safety, it can limit the scalability of multithreaded Python programs, especially on multi-core systems. Developers need to consider the trade-offs between simplicity and performance when choosing between threading and multiprocessing in Python.
Overall, the GIL is a characteristic feature of Python's CPython interpreter and has implications for multithreading and parallelism in Python programs. It's important for developers to understand its behavior and its impact on the performance of their Python applications.
Tests Driven Development
from dataclasses import dataclass, field
from enum import Enum
class OrderStatus(Enum):
OPEN = "open"
PAID = "paid"
@dataclass
class LineItem:
name: str
price: int
quantity: int = 1
@property
def total(self) -> int:
return self.price * self.quantity
@dataclass
class Order:
line_items: list[LineItem] = field(default_factory=list)
status: OrderStatus = OrderStatus.OPEN
@property
def total(self) -> int:
return sum(item.total for item in self.line_items)
def pay(self) -> None:
self.status = OrderStatus.PAID
from pay.order import LineItem
def test_line_item_total() -> None:
line_item = LineItem(name="Test", price=100)
assert line_item.total == 100
def test_line_item_total_quantity() -> None:
line_item = LineItem(name="Test", price=100, quantity=2)
assert line_item.total == 200
Debugging
General Debugging
Understand the System
- Read the documentation from cover-to-cover to understand how to get the results you want
- Go in depth on things applicable at the moment
- Know your roadmap
- Understand what is black box and what is not
- Understand your debugging tools
- What tools do you have in order to solve the issue? Learn them in detail.
- Do debug logs exist?
Make it Fail
- Do it again so you can look at it, focus on the cause, and know when it is fixed
- Start at the beginning, at a known state that is reliable.
- Simulate the conditions that stimulate the failure.
- Its fine to recreate the environment of failure to an extent, but at some point the failing system may not be identical to the recreated environment.
- Record everything and find the signature of intermittent bugs
Quit Thinking and Look
- Looking is hard, in Software Code it means put in breakpoints, add debug statements, monitoring program values, and examining memory. In Data, it means look at the data manually
- Guess only to narrow the search, but always look to make sure that is indeed the issue
- Build tools to insure that it is fixed
Divide and Conquer
- Narrow the search with successive approximation.
- Determine which side the bug is on
- Use easy-to-spot test patterns
- Start with the bad/bug and go backwards
Change One Thing at a Time
- Isolate the key factor
- Change one test at a time and remember to revert back to the state if the change did not fix
- Compare with a good one
- Determine what you changed since the last time it worked properly
Keep and Audit Trail
- Document what you did, in what order, and what happened as a result
- Any detail could be an important one
- Correlate events.
- "It made noise for four seconds starting at 21:04:53" is better than "it made noise"
Check the Plug
- Question your assumptions
- Are you running the latest code?
- Start at the Beginning
- Is it plugged in to power? Is power working to begin with?
- Is the correct input going through?
- Test the Tool
- Does it work on others?
Get a Fresh View
- Ask for fresh insights
- Coworkers is all around you, and consider tracking down an expert
- Report Symptoms, Not theories
- See if a colleague can reach same conclusion without telling them your conclusion
If you Didnt Fix it, It Ain't Fixed
- Check to see if its really fixed
- Problems do not go away by itself
- Learn from the fix, and design better in the future
VSCode Shortcuts and Extensions
Python Debugging
Coding Interview Patterns
Getting Started
1] Read (and Reread) Carefully and Understand the Problem
Putting the problem in your own words is a powerful way to solidify your understanding of the problem and show a potential interviewer you know what you’re doing.
- Ask Questions to Clarify Doubt: Seek clarifications if anything is unclear. Don't assume details.
- Provide Example Cases to Confirm: Work through examples manually to understand the expected outcomes.
- Plan Your Approach: Outline a logical plan and identify which DS&A could solve the problem. Break problems to sub problems. Always acknowledge the brute force solution if spotted.
Evaluate Input:
- Is it a single array? Or multiple arrays?
- Are there any constraints on the size of the array?
- Can the array contain
- negative numbers
- floating-point numbers
- ...or other data types?
- Is the array presorted?
- Is the array sequential?
- Can the array elements align with the index if its sequential
- Do they have negative values?
Problem Constraints:
- Are there any time complexity requirements for the solution?
- O(1): operations in-place and cannot use additional memory (variables, arrays, dictionaries)
- Are there any space considerations for the solution?
- O(1) means using Hash maps (dictionary)
Output:
- Is it a single value, an array, or something else?
- Are there any specific requirements or constraints on the output format?
Edge Cases:
- Should the algorithm handle edge cases such as
- empty array?
- arrays with only one element?
- arrays with all identical elements?
- Understand the Problem:
- Read and comprehend the problem statement.
- Clarify Doubts:
- Ask the interviewer for clarification if needed.
- Ask Questions:
- Gather more information about the problem.
- Design a Plan:
- Devise an approach to solve the problem.
- Break Down the Problem:
- Divide the problem into smaller sub problems if necessary.
- Choose the Right Data Structures and Algorithms:
- Select appropriate tools based on problem requirements.
- Write Pseudocode:
- Outline the solution logic without worrying about syntax.
- Code Implementation:
- Write the actual code following best practices.
- Test Your Solution:
- Verify correctness and robustness with test cases.
- Optimize if Necessary:
- Improve time or space complexity if possible.
- Handle Errors and Edge Cases:
- Ensure graceful handling of errors and edge cases.
- Review and Debug:
- Check for errors and bugs, and troubleshoot as needed.
- Communicate Your Thought Process:
- Explain your approach and reasoning to the interviewer.
- Be Flexible and Adaptive:
- Adapt your approach based on feedback or new insights.
- Practice Regularly:
- Improve problem-solving skills through practice and mock interviews.
2. If you forget a builtin method, use 'print(dir())' in interactive terminal
This also works on your own methods as well
print(dir(list))
[ __DUNDER_METHODS__ 'append', 'clear', 'copy', 'count', 'extend', 'index', 'insert', 'pop', 'remove', 'reverse', 'sort']For more in depth information use help(list), but remember to press 'q' in interactive prompt when you want to end process.
| append(self, object, /)
| Append object to the end of the list.
|
| clear(self, /)
| Remove all items from list.
|
| copy(self, /)
| Return a shallow copy of the list.
|
| count(self, value, /)
| Return number of occurrences of value.
|
| extend(self, iterable, /)
| Extend list by appending elements from the iterable.
|
| index(self, value, start=0, stop=9223372036854775807, /)
| Return first index of value.
|
| Raises ValueError if the value is not present.
|
| insert(self, index, object, /)
| Insert object before index.
|
| pop(self, index=-1, /)
| Remove and return item at index (default last).
|
| Raises IndexError if list is empty or index is out of range.
|
| remove(self, value, /)
| Remove first occurrence of value.
|
| Raises ValueError if the value is not present.
|
| reverse(self, /)
| Reverse *IN PLACE*.
|
| sort(self, /, *, key=None, reverse=False)
| Sort the list in ascending order and return None.
|
| The sort is in-place (i.e. the list itself is modified) and stable (i.e. the
| order of two equal elements is maintained).
|
| If a key function is given, apply it once to each list item and sort them,
| ascending or descending, according to their function values.
|
| The reverse flag can be set to sort in descending order.Big O
How should we describe the speed of an algorithm? One idea is to just count the total number of
primitive operations it does (read, writes, comparisons) when given an input of size n. For example:
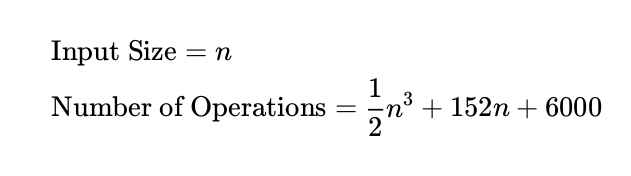
The thing is, it's hard to come up with a formula like this, and the coefficients will vary based on what
processor you use. To simplify this, computer scientists only talk about how the algorithm's speed
scales when n gets very large. The biggest-order term always kills the other terms when n gets very
large (plug in n=1,000,000). So computer scientists only talk about the biggest term, without any
coefficients. The above algorithm has n3 as the biggest term, so we say that:
Time Complexity = O(n3 )
Verbally, you say that the algorithm takes "on the order of n3 operations". In other words, when n gets
very big, we can expect to do around n3 operations.
Computer scientists describe memory based on how it scales too. If your progam needs 51n2 + 200n
units of storage, then computer scientists say Space Complexity = O(n2 ).
Time ≥ Space
The Time Complexity is always greater than or equal to the Space Complexity. If you build a size
10,000 array, that takes at least 10,000 operations. It could take more if you reused space, but it can't
take less - you're not allowed to reuse time (or go back in time) in our universe.
Brute Force
A brute force solution is an approach to problem-solving that involves trying all possible solutions exhaustively, without any optimization or algorithmic insight. In a brute force solution, you typically iterate through all possible combinations or permutations of the input data until you find the solution.
Here are some characteristics of a brute force solution:
While brute force solutions are often simple and conceptually easy to understand, they are generally not suitable for real-world applications or problems with large input sizes due to their inefficiency. Instead, more efficient algorithms and problem-solving techniques, such as dynamic programming, greedy algorithms, or data structures like hashmaps and heaps, are preferred for solving complex problems in a scaleable and efficient manner.
In this brute force solution:
- We iterate over each pair of numbers in the array using two nested loops.
- For each pair of numbers, we calculate their product.
- We keep track of the maximum product found so far.
- Finally, we return the maximum product found after iterating through all pairs of numbers.
While this brute force solution is simple and easy to understand, it has a time complexity of O(n^2) due to the nested loops, where n is the size of the input array. As a result, it may not be efficient for large arrays.
def max_product_bruteforce(nums):
max_product = float('-inf')
for i in range(len(nums)):
for j in range(i + 1, len(nums)):
product = nums[i] * nums[j]
max_product = max(max_product, product)
return max_product
# Example usage:
nums = [3, 5, 2, 6, 8, 1]
result = max_product_bruteforce(nums)
print("Maximum product of two numbers in the array:", result) # Output: 48 (8 * 6)A more efficient solution to the problem of finding the maximum product of two numbers in an array can be achieved by using a greedy approach. Here's how it works:
- We can sort the array in non-decreasing order.
- The maximum product of two numbers will either be the product of the two largest numbers (if both are positive) or the product of the largest positive number and the smallest negative number (if the array contains negative numbers).
Here's the implementation of the optimized solution:
def max_product(nums):
nums.sort()
n = len(nums)
# Maximum product will be either the product of the two largest numbers or the product of the largest positive number and the smallest negative number
return max(nums[-1] * nums[-2], nums[0] * nums[1])
# Example usage:
nums = [3, 5, 2, 6, 8, 1]
result = max_product(nums)
print("Maximum product of two numbers in the array:", result) # Output: 48 (8 * 6)This solution has a time complexity of O(n log n) due to the sorting step, which is more efficient than the brute force solution's time complexity of O(n^2). Additionally, it has a space complexity of O(1) since it doesn't require any extra space beyond the input array. Therefore, the optimized solution is more efficient and scalable for larger arrays.
Hashmap
Hashmap Pattern:
- Finding Pairs
- Frequency Counting
- Unique Elements
- Mapping Relationships
- Lookup or Search Operations
- Grouping or Categorization
- Detecting Patterns
- Optimizing Time Complexity
- Avoiding Nested Loops
- Storing State or Metadata
-
Finding Pairs: Problems that involve finding pairs of elements with a specific property, such as pairs that sum up to a target value.
-
Frequency Counting: Problems that require counting the frequency of elements or characters within a collection.
-
Unique Elements: Problems that require ensuring all elements in the collection are unique.
-
Mapping Relationships: Problems that involve mapping relationships between elements, such as mapping an element to its index or another related element.
-
Lookup or Search Operations: Problems that require efficient lookup or search operations based on the properties or values of elements.
-
Grouping or Categorization: Problems that involve grouping or categorizing elements based on certain criteria or properties.
-
Detecting Patterns: Problems that require detecting patterns or similarities between elements or subsets of elements.
-
Optimizing Time Complexity: Problems where using a hashmap can lead to an optimized solution with better time complexity compared to other approaches.
-
Avoiding Nested Loops: Problems where using a hashmap can help avoid nested loops or improve the efficiency of nested loop-based solutions.
-
Storing State or Metadata: Problems that require storing additional state or metadata associated with elements in the collection.
The typically involves a FOR loop and the following components
-
Initialize Hashmap: Create an empty hashmap (dictionary) to store elements and their indices.
-
Iterate Through the List: Use a loop to iterate through each element in the input list
nums. Keep track of the current index using theenumerate()function. -
Calculate Complement: For each element
num, calculate its complement by subtracting it from the target value (target - num). This complement represents the value that, when added tonum, will equal the target. -
Check if Complement Exists: Check if the complement exists in the hashmap. If it does, it means we've found a pair of numbers that sum up to the target. Return the indices of the current element
numand its complement from the hashmap. -
Store Element in Hashmap: If the complement does not exist in the hashmap, it means we haven't encountered the required pair yet. Store the current element
numand its index in the hashmap. This allows us to look up the complement efficiently in future iterations. -
Return Result: If no such pair is found after iterating through the entire list, return an empty list, indicating that no pair of numbers sum up to the target.
def find_pair_with_given_sum(nums, target):
hashmap = {} # Create an empty hashmap to store elements and their indices
for i, num in enumerate(nums):
complement = target - num # Calculate the complement for the current element
if complement in hashmap:
return [hashmap[complement], i] # If complement exists in the hashmap, return the indices
hashmap[num] = i # Store the current element and its index in the hashmap
return [] # If no such pair is found, return an empty list
# Example usage:
nums = [2, 7, 11, 15]
target = 9
result = find_pair_with_given_sum(nums, target)
print("Indices of two numbers that sum up to", target, ":", result) # Output: [0, 1] (2 + 7 = 9)def high(array):
freq_map = {}
for i in array:
if i in freq_map:
freq_map[i]=freq_map[i] + 1
else:
freq_map[i]=(1)
return freq_map
print(high([5,7,3,7,5,6]))
{5:2 ,7:2, 3:1, 6:1} Cycle Sort
Cycle Sort:
Key Terms
- Missing/Repeated/Duplicate Numbers
- Unsorted Array
- Permutation/Sequence
- In-place Sorting
- Unique Elements
- Indices/Positions
- Range of Numbers
- Fixed Range/Constant Range
- Modifying Indices/Positions
- Array Shuffling
- Swapping Elements
- Array Partitioning
-
Range of Numbers: The problem involves an array containing a permutation of numbers from 1 to N, where N is the length of the array or a known upper bound. The numbers in the array are expected to be consecutive integers starting from 1.
-
Missing Numbers or Duplicates: The problem requires finding missing numbers or duplicates within the given array. Typically, the array may have some missing numbers or duplicates, disrupting the sequence of consecutive integers.
-
No Negative Numbers or Zeroes: The problem specifies that the array contains only positive integers, excluding zero and negative numbers. Cyclic sort works efficiently with positive integers and relies on the absence of zero or negative values.
-
Linear Time Complexity Requirement: The problem constraints or requirements indicate the need for a solution with linear time complexity (O(N)), where N is the size of the array. Cyclic sort achieves linear time complexity as it involves iterating through the array once or a few times.
-
In-Place Sorting Requirement: The problem requires sorting the array in-place without using additional data structures or consuming extra space. Cyclic sort operates by rearranging the elements within the given array, fulfilling the in-place sorting requirement.
Steps
The Cyclic Sort Pattern typically involves a WHILE loop and the following components:
-
Initialization: Start by initializing a pointer
ito 0. -
Iterative Sorting: Repeat the following steps until
ireaches the end of the array:- Look at the elements in the array to calculate the correct index, and see where the range lies. For example [0,5,4,2,1,3] means it is 0-N while [3,4,5,1,2] means its is 1-N.
- 0 to N. the correct index for the number
xat indexiwould bex - 1 to N, the correct index for the number
xat indexiwould bex - 1because index starts at 0, not 1
- 0 to N. the correct index for the number
- Check if the number at index
iis already in its correct position. If it is, incrementito move to the next element. - If the number at index
iis not in its correct position, swap it with the number at its correct index. - Repeat these steps until numbers are placed in their correct positions.
- Look at the elements in the array to calculate the correct index, and see where the range lies. For example [0,5,4,2,1,3] means it is 0-N while [3,4,5,1,2] means its is 1-N.
-
Termination: Once
ireaches the end of the array, the array is sorted. - Once this sorted array is created, typically use another array to cycle through to ensure the index matches with the number
def cyclic_sort(nums):
i = 0
while i < len(nums):
correct_index = nums[i] - 1 # Correct index for the associated number. Since nums is 1-N, then add -1 to prevent error
if nums[i] != nums[correct_index]: # If the number is not at its correct index.
nums[i], nums[correct_index] = nums[correct_index], nums[i] # Swap the numbers
else:
i += 1 # Evaluate the next number if it's already at the correct index
return nums
# Example usage:
arr = [3, 1, 5, 4, 2]
print(cyclic_sort(arr))
# Ex. of swaps in the Loop
# [5,1,3,4,2]
# [2,1,3,4,5]
# Output: [1, 2, 3, 4, 5]Visualization:
[4,2,5,6,3,1,7,8]
[6,2,5,4,3,1,7,8]
[1,2,5,4,3,6,7,8]
next iteration [1,2,5,4,3,6,7,8]
next iteration [1,2,5,4,3,6,7,8]
[1,2,3,4,5,6,7,8]
next iteration [1,2,3,4,5,6,7,8]
next iteration [1,2,3,4,5,6,7,8]
next iteration [1,2,3,4,5,6,7,8]
next iteration [1,2,3,4,5,6,7,8]
next iteration [1,2,3,4,5,6,7,8]
next iteration [1,2,3,4,5,6,7,8]

https://youtu.be/jTN7vLqzigc?si=hPJ9mLPanY_d3RTp&t=37
Big O Complexity:
Time: O(n2) but analyze why this works better over time than other SORTING algorithms
Space: O(1) since it is in-place
One of the advantages of cycle sort is that it has a low memory footprint, as it sorts the array in-place and does not require additional memory for temporary variables or buffers. However, it can be slow in certain situations, particularly when the input array has a large range of values. Nonetheless, cycle sort remains a useful sorting algorithm in certain contexts, such as when sorting small arrays with limited value ranges.
Cycle sort is an in-place sorting Algorithm, unstable sorting algorithm, and a comparison sort that is theoretically optimal in terms of the total number of writes to the original array.
- It is optimal in terms of the number of memory writes. It minimizes the number of memory writes to sort (Each value is either written zero times if it’s already in its correct position or written one time to its correct position.)
Two Pointers
Two Pointers:
- Sorted Array/Array is Sorted
- Two Indices/Pointers
- Pointer Manipulation
- Searching/Comparing/Pair Sum
- Closest/Difference
- Intersection/Union of Arrays
- Partitioning/Subarray with Specific Property
- Sliding Window Technique Mentioned Indirectly
- Multiple Pointers Technique
- Removing Duplicates
- Rearranging Array/Reversing Subarray
- Array Traversal
-
Sorted Arrays or Linked Lists: If the problem involves a sorted array or linked list, the Two Pointers Pattern is often applicable. By using two pointers that start from different ends of the array or list and move inward, you can efficiently search for a target element, find pairs with a given sum, or remove duplicates.
-
Window or Range Operations: If the problem requires performing operations within a specific window or range of elements in the array or list, the Two Pointers Pattern can be useful. By adjusting the positions of two pointers, you can control the size and position of the window and efficiently process the elements within it.
-
Checking Palindromes or Subsequences: If the problem involves checking for palindromes or subsequences within the array or list, the Two Pointers Pattern provides a systematic approach. By using two pointers that move toward each other or in opposite directions, you can compare elements symmetrically and determine whether a palindrome or subsequence exists.
-
Partitioning or Segregation: If the problem requires partitioning or segregating elements in the array or list based on a specific criterion (e.g., odd and even numbers, positive and negative numbers), the Two Pointers Pattern is often effective. By using two pointers to swap elements or adjust their positions, you can efficiently partition the elements according to the criterion.
-
Meeting in the Middle: If the problem involves finding a solution by converging two pointers from different ends of the array or list, the Two Pointers Pattern is well-suited. By moving the pointers toward each other and applying certain conditions or criteria, you can identify a solution or optimize the search process.
The Two Pointers Pattern typically involves a WHILE loop and the following components:
-
Initialization: Initialize two pointers (or indices) to start from different positions within the array or list. These pointers may initially point to the beginning, end, or any other suitable positions based on the problem requirements.
-
Pointer Movement: Move the pointers simultaneously through the array or list, typically in a specific direction (e.g., toward each other, in the same direction, with a fixed interval). The movement of the pointers may depend on certain conditions or criteria within the problem.
-
Condition Check: At each step or iteration, check a condition involving the elements pointed to by the two pointers. This condition may involve comparing values, checking for certain patterns, or performing other operations based on the problem requirements.
-
Pointer Adjustment: Based on the condition check, adjust the positions of the pointers as necessary. This adjustment may involve moving both pointers forward, moving only one pointer, or changing the direction or speed of pointer movement based on the problem logic.
-
Termination: Continue moving the pointers and performing condition checks until a specific termination condition is met. This condition may involve reaching the end of the array or list, satisfying a specific criterion, or finding a solution to the problem.
def two_sum(nums, target):
left, right = 0, len(nums) - 1 # Initialize two pointers at the beginning and end of the array
while left < right:
current_sum = nums[left] + nums[right]
if current_sum == target:
return [left, right] # Return the indices of the two numbers that sum up to the target
elif current_sum < target:
left += 1 # Move the left pointer to the right to increase the sum
else:
right -= 1 # Move the right pointer to the left to decrease the sum
return [] # If no such pair is found, return an empty list
# Example usage:
nums = [-2, 1, 2, 4, 7, 11]
target = 13
result = two_sum(nums, target)
print("Indices of two numbers that sum up to", target, ":", result) # Output: [2, 4] (2 + 11 = 13)Sliding Window
Key terms:
- Fixed Size Subarray
- Maximum/Minimum Subarray
- Consecutive/Continuous Elements
- Longest/Shortest Substring
- Optimal Window
- Substring/Window/Range
- Frequency Count
- Non-overlapping/Subsequence
- Sum/Product/Average in a Window
- Smallest/Largest Window
- Continuous Increasing/Decreasing
-
Finding Subarrays or Substrings: If the problem involves finding a contiguous subarray or substring that meets specific criteria (such as having a certain sum, length, or containing certain elements), the Sliding Window Pattern is likely applicable. Examples include problems like finding the maximum sum subarray, the longest substring with K distinct characters, or the smallest subarray with a sum greater than a target value.
-
Optimizing Brute-Force Solutions: If you have a brute-force solution that involves iterating over all possible subarrays or substrings, the Sliding Window Pattern can often help optimize the solution by reducing unnecessary iterations. By maintaining a window of elements or characters and adjusting its size dynamically, you can avoid redundant computations and achieve better time complexity.
-
Tracking Multiple Pointers or Indices: If the problem involves maintaining multiple pointers or indices within the array or string, the Sliding Window Pattern provides a systematic approach to track and update these pointers efficiently. This is especially useful for problems involving two pointers moving inward from different ends of the array or string.
-
Window Size Constraints: If the problem imposes constraints on the size of the window (e.g., fixed-size window, window with a maximum or minimum size), the Sliding Window Pattern is well-suited for handling such scenarios. You can adjust the window size dynamically while processing the elements or characters within the array or string.
-
Time Complexity Optimization: If the problem requires optimizing time complexity while processing elements or characters in the array or string, the Sliding Window Pattern offers a strategy to achieve linear or near-linear time complexity. By efficiently traversing the array or string with a sliding window, you can often achieve better time complexity compared to naive approaches.
The Sliding Window Pattern typically involves a FOR loop and the following components:
-
Initialization: Start by initializing two pointers or indices: one for the start of the window (left pointer) and one for the end of the window (right pointer). These pointers define the current window.
-
Expanding the Window: Initially, the window may start with a size of 1 or 0. Move the right pointer to expand the window by including more elements or characters from the array or string. The window grows until it satisfies a specific condition or constraint.
-
Contracting the Window: Once the window satisfies the condition or constraint, move the left pointer to contract the window by excluding elements or characters from the beginning of the window. Continue moving the left pointer until the window no longer satisfies the condition or constraint.
-
Updating Results: At each step, update the result or perform necessary operations based on the elements or characters within the current window. This may involve calculating the maximum/minimum value, computing a sum, checking for a pattern, or solving a specific subproblem.
-
Termination: Continue moving the window until the right pointer reaches the end of the array or string. At this point, the algorithm terminates, and you obtain the final result based on the operations performed during each iteration of the window.
def max_sum_subarray(array, k):
window_sum = 0
max_sum = float('-inf') #infinitely small number
window_start = 0
for window_end in range(len(array)):
window_sum = window_sum + array[window_end] # Add the next element to the window
# If the window size exceeds 'k', slide the window by one element
if window_end >= k - 1:
max_sum = max(max_sum, window_sum) # Update the maximum sum
print(max_sum)
window_sum = window_sum - array[window_start] # Subtract the element going out of the window
window_start = window_start + 1 # Slide the window to the right
return max_sum
# Example usage:
array = [1, 3, -1, -3, 5, 3, 6, 7]
k = 3
result = max_sum_subarray(array, k)
print(array)
print("Maximum sum of subarray of size", k, ":", result) # Output: 16 (subarray: [3, 6, 7])
Getting Started part2
1. Make a good self introduction at the start of the interview
- ✅ Introduce yourself in a few sentences under a minute or 2.
Follow our guide on how to make a good self introduction for software engineers
- ✅ Sound enthusiastic!
Speak with a smile and you will naturally sound more engaging.
- ❌ Do not spend too long on your self introduction as you will have less time left to code.
2. Upon receiving the question, make clarifications
Do not jump into coding right away. Coding questions tend to be vague and underspecified on purpose to allow the interviewer to gauge the candidate's attention to detail and carefulness. Ask at least 2-3 clarifying questions.
- ✅ Paraphrase and repeat the question back at the interviewer.
Make sure you understand exactly what they are asking.
- ✅ Clarify assumptions (Refer to algorithms cheatsheets for common assumptions)
-
A tree-like diagram could very well be a graph that allows for cycles and a naive recursive solution would not work. Clarify if the given diagram is a tree or a graph.
-
Can you modify the original array / graph / data structure in any way?
-
How is the input stored?
-
If you are given a dictionary of words, is it a list of strings or a Trie?
-
Is the input array sorted? (e.g. for deciding between binary / linear search)
-
- ✅ Clarify input value range.
Inputs: how big and what is the range?
- ✅ Clarify input value format
Values: Negative? Floating points? Empty? Null? Duplicates? Extremely large?
- ✅ Work through a simplified example to ensure you understood the question.
E.g., you are asked to write a palindrome checker, before coding, come up with simple test cases like "KAYAK" => true, "MOUSE" => false, then check with the interviewer if those example cases are in line with their expectations
- ❌ Do not jump into coding right away or before the interviewer gives you the green light to do so.
3. Work out and optimize your approach with the interviewer
The worst thing you can do next is jump straight to coding - interviewers expect there to be some time for a 2-way discussion on the correct approach to take for the question, including analysis of the time and space complexity.
This discussion can range from a few minutes to up to 5-10 minutes depending on the complexity of the question. This also gives interviewers a chance to provide you with hints to guide you towards an acceptable solution.
-
✅ If you get stuck on the approach or optimization, use this structured way to jog your memory / find a good approach
-
✅ Explain a few approaches that you could take at a high level (don't go too much into implementation details). Discuss the tradeoffs of each approach with your interviewer as if the interviewer was your coworker and you all are collaborating on a problem.
For algorithmic questions, space/time is a common tradeoff. Let's take the famous Two Sum question for example. There are two common solutions
- Use nested for loops. This would be O(n2) in terms of time complexity and O(1) in terms of space.
- In one pass of the array, you would hash a value to its index into a hash table. For subsequent values, look up the hash table to see if you can find an existing value that can sum up to the target. This approach is O(N) in terms of both time and space. Discuss both solutions, mention the tradeoffs and conclude on which solution is better (typically the one with lower time complexity)
-
✅ State and explain the time and space complexity of your proposed approach(es).
Mention the Big O complexity for time and explain why (e.g O(n2) for time because there are nested for loops, O(n) for space because an extra array is created). Master all the time and space complexity using the algorithm optimization techniques.
-
✅ Agree on the most ideal approach and optimize it. Identify repeated/duplicated/overlapping computations and reduce them via caching. Refer to the page on optimizing your solution.
-
❌ Do not jump into coding right away or before the interviewer gives you the green light to do so.
-
❌ Do not ignore any piece of information given.
-
❌ Do not appear unsure about your approach or analysis.
4. Code out your solution while talking through it
- ✅ Only start coding after you have explained your approach and the interviewer has given you the green light.
- ✅ Explain what you are trying to achieve as you are coding / writing. Compare different coding approaches where relevant.
In so doing, demonstrate mastery of your chosen programming language.
- ✅ Code / write at a reasonable speed so you can talk through it - but not too slow.
You want to type slow enough so you can explain the code, but not too slow as you may run out of time to answer all questions
- ✅ Write actual compilable, working code where possible, not pseudocode.
- ✅ Write clean, straightforward and neat code with as few syntax errors / bugs as possible.
Always go for a clean, straightforward implementation than a complex, messy one. Ensure you adopt a neat coding style and good coding practices as per language paradigms and constructs. Syntax errors and bugs should be avoided as much as possible.
- ✅ Use variable names that explain your code.
Good variable names are important because you need to explain your code to the interviewer. It's better to use long variable names that explain themselves. Let's say you need to find the multiples of 3 in an array of numbers. Name your results array
multiplesOfThreeinstead of array/numbers. - ✅ Ask for permission to use trivial functions without having to implement them.
E.g.
reduce,filter,min,maxshould all be ok to use - ✅ Write in a modular fashion, going from higher-level functions and breaking them down into smaller helper functions.
Let's say you're asked to build a car. You can just write a few high level functions first:
gatherMaterials(),assemble(). Then break downassemble()into smaller functions,makeEngine(),polishWheels(),constructCarFrame(). You could even ask the interviewer if it's ok to not code out some trivial helper functions. - ✅ If you are cutting corners in your code, state that out loud to your interviewer and say what you would do in a non-interview setting (no time constraints).
E.g., "Under non-interview settings, I would write a regex to parse this string rather than using
split()which may not cover certain edge cases." - ✅ [Onsite / Whiteboarding] Practice whiteboard space management
- ❌ Do not interrupt your interviewer when they are talking. Usually if they speak, they are trying to give you hints or steer you in the right direction.
- ❌ Do not spend too much time writing comments.
- ❌ Do not repeat yourself
- ❌ Do not use bad variable names.
- Do not use extremely verbose or single-character variable names, (unless they're common like
i,n) variable names
- Do not use extremely verbose or single-character variable names, (unless they're common like
- ❌ Do not copy and paste code without checking (e.g. some variables might need to be renamed after pasting).
5. After coding, check your code and add test cases
Once you are done coding, do not announce that you are done. Interviewers expect you to start scanning for mistakes and adding test cases to improve on your code.
- ✅ Scan through your code for mistakes - such as off-by-one errors.
Read through your code with a fresh pair of eyes - as if it's your first time seeing a piece of code written by someone else - and talk through your process of finding mistakes
- ✅ Brainstorm edge cases with the interviewer and add additional test cases. (Refer to algorithms cheatsheets for common corner cases)
Given test cases are usually simple by design. Brainstorm on possible edge cases such as large sized inputs, empty sets, single item sets, negative numbers.
- ✅ Step through your code with those test cases.
- ✅ Look out for places where you can refactor.
- ✅ Reiterate the time and space complexity of your code.
This allows you to remind yourself to spot issues within your code that could deviate from the original time and space complexity.
- ✅ Explain trade-offs and how the code / approach can be improved if given more time.
- ❌ Do not immediately announce that you are done coding. Do the above first!
- ❌ Do not argue with the interviewer. They may be wrong but that is very unlikely given that they are familiar with the question.
6. At the end of the interview, leave a good impression
- ✅ Ask good final questions that are tailored to the company.
Read tips and sample final questions to ask.
- ✅ Thank the interviewer
- ❌ Do not end the interview without asking any questions.
Object Oriented Programming
Object Oriented Basics
Yes, all the object-oriented programming (OOP) terms and concepts mentioned apply to Python. Python is a multi-paradigm programming language that fully supports object-oriented programming. In fact, OOP is one of the primary programming paradigms used in Python, and its syntax and features are designed to facilitate object-oriented design and development.
Here's how these OOP terms apply to Python specifically:
-
Class: In Python, classes are defined using the
classkeyword, and they encapsulate data (attributes) and behavior (methods). Objects are created by instantiating classes using the class name followed by parentheses, optionally passing arguments to the constructor (__init__method). -
Object: Objects in Python are instances of classes. They have attributes (instance variables) and methods (functions defined within the class). Objects are created dynamically at runtime and can be assigned to variables, passed as arguments, and returned from functions.
-
Attribute: Attributes in Python are data items associated with objects. They can be accessed using dot notation (
object.attribute) or through methods defined within the class. Attributes can be public, private (using name mangling), or protected (using single underscore convention). -
Method: Methods in Python are functions defined within a class that operate on its instances. They are defined using the
defkeyword within the class definition. Methods can access and modify the object's state (attributes) and behavior. -
Inheritance: Python supports single and multiple inheritance, allowing classes to inherit attributes and methods from one or more parent classes. Inheritance relationships are defined using parentheses after the class name in the class definition.
-
Encapsulation: Python supports encapsulation through the use of classes, which bundle data and methods together. Python does not have built-in support for access modifiers like private or protected, but encapsulation can be achieved through conventions and name mangling.
-
Polymorphism: Python supports polymorphism through method overriding and duck typing. Method overriding allows subclasses to provide their own implementation of methods inherited from parent classes, while duck typing allows objects to be treated uniformly based on their behavior rather than their type.
-
Abstraction: Python supports abstraction through classes and interfaces, allowing programmers to model real-world entities and concepts while hiding implementation details. Python encourages writing code that operates on interfaces rather than concrete implementations.
-
Constructor and Destructor: In Python, the constructor is defined using the
__init__method, which is automatically called when an object is instantiated. Python does not have explicit destructors, but the__del__method can be used to define cleanup tasks when an object is garbage-collected. -
Instance, Class, and Instance Variables: Python distinguishes between instance variables (attributes specific to individual objects) and class variables (attributes shared among all instances of a class). Instance variables are defined within methods using the
selfparameter, while class variables are defined outside methods within the class. -
Method Overriding and Overloading: Python supports method overriding by allowing subclasses to provide their own implementations of methods inherited from parent classes. However, Python does not support method overloading in the traditional sense (having multiple methods with the same name but different signatures), but you can achieve similar functionality using default parameter values or variable-length argument lists.
Overall, Python's support for object-oriented programming makes it a versatile and powerful language for designing and implementing software systems using OOP principles.
In Python, the self keyword is used within methods of a class to refer to the instance of the class itself. It is passed implicitly as the first argument to instance methods, allowing those methods to access and modify attributes of the instance. Here's a guideline on when to use self and when not to:
Use self:
-
Inside Instance Methods: Within instance methods, use
selfto access instance attributes and methods.
class MyClass:
def __init__(self, value):
self.value = value
def print_value(self):
print(self.value)
obj = MyClass(10)
obj.print_value() # Output: 10
When Assigning Instance Attributes: Use self to assign instance attributes within the __init__ method or other instance methods.
class MyClass:
def __init__(self, value):
self.value = value
obj = MyClass(10)Do Not Use self:
Outside Class Definition: When accessing class attributes or methods outside the class definition, you do not need to use self.
class MyClass:
class_attribute = 100
def __init__(self, value):
self.instance_attribute = value
obj = MyClass(10)
print(obj.instance_attribute) # Output: 10
print(MyClass.class_attribute) # Output: 100Static Methods and Class Methods: In static methods and class methods, self is not used because these methods are not bound to a specific instance.
class MyClass:
@staticmethod
def static_method():
print("Static method")
@classmethod
def class_method(cls):
print("Class method")
MyClass.static_method() # Output: Static method
MyClass.class_method() # Output: Class methodRemember that self is a convention in Python, and you could technically name the first parameter of an instance method anything you like, but using self is highly recommended for readability and consistency with Python conventions.
Encapsulation
Class Creation Considerations:

-
- Encapsulation: the bundling of Variables and Methods in a Class to ensures that the behavior of an object can only be affected through its Public API. It lets us control how much a change to one object will impact other parts of the system by ensuring that there are no unexpected dependencies between unrelated components.
- Attributes: Variables are assigned attributes within a __init__ function
- Public API: Methods are functions that manipulate the Attributes, such as get/set
- Information Hiding: Restricting access to implementation details and violating state invariance
- Protected Variable:
- Members of the class that cannot be accessed outside the class but can be accessed from within the class and its subclasses
- In Python, Using underscore (_name) to denote Protected
- Private Variable:
- Members can neither be accessed outside the class nor by any base class
- In Python, double underscore (__name) to denote Private.
- Note that Python is not a true Protected or Private enforced by the language like C++
- Can still access protected and private variables via dot notation ( hello._name)
- Protected Variable:
- Encapsulation: the bundling of Variables and Methods in a Class to ensures that the behavior of an object can only be affected through its Public API. It lets us control how much a change to one object will impact other parts of the system by ensuring that there are no unexpected dependencies between unrelated components.
from dataclasses import dataclass
from enum import Enum
from typing import Any
class PaymentStatus(Enum):
CANCELLED = "cancelled"
PENDING = "pending"
PAID = "paid"
class PaymentStatusError(Exception):
pass
@dataclass
class OrderNoEncapsulationNoInformationHiding:
"""Anyone can get the payment status directly via the instance variable.
There are no boundaries whatsoever."""
payment_status: PaymentStatus = PaymentStatus.PENDING
@dataclass
class OrderEncapsulationNoInformationHiding:
"""There's an interface now that you should use that provides encapsulation.
Users of this class still need to know that the status is represented by an enum type."""
_payment_status: PaymentStatus = PaymentStatus.PENDING
def get_payment_status(self) -> PaymentStatus:
return self._payment_status
def set_payment_status(self, status: PaymentStatus) -> None:
if self._payment_status == PaymentStatus.PAID:
raise PaymentStatusError(
"You can't change the status of an already paid order."
)
self._payment_status = status
@dataclass
class OrderEncapsulationAndInformationHiding:
"""The status variable is set to 'private'. The only thing you're supposed to use is the is_paid
method, you need no knowledge of how status is represented (that information is 'hidden')."""
_payment_status: PaymentStatus = PaymentStatus.PENDING
def is_paid(self) -> bool:
return self._payment_status == PaymentStatus.PAID
def is_cancelled(self) -> bool:
return self._payment_status == PaymentStatus.CANCELLED
def cancel(self) -> None:
if self._payment_status == PaymentStatus.PAID:
raise PaymentStatusError("You can't cancel an already paid order.")
self._payment_status = PaymentStatus.CANCELLED
def pay(self) -> None:
if self._payment_status == PaymentStatus.PAID:
raise PaymentStatusError("Order is already paid.")
self._payment_status = PaymentStatus.PAID
@dataclass
class OrderInformationHidingWithoutEncapsulation:
"""The status variable is public again (so there's no boundary),
but we don't know what the type is - that information is hidden. I know, it's a bit
of a contrived example - you wouldn't ever do this. But at least it shows that
it's possible."""
payment_status: Any = None
def is_paid(self) -> bool:
return self.payment_status == PaymentStatus.PAID
def is_cancelled(self) -> bool:
return self.payment_status == PaymentStatus.CANCELLED
def cancel(self) -> None:
if self.payment_status == PaymentStatus.PAID:
raise PaymentStatusError("You can't cancel an already paid order.")
self.payment_status = PaymentStatus.CANCELLED
def pay(self) -> None:
if self.payment_status == PaymentStatus.PAID:
raise PaymentStatusError("Order is already paid.")
self.payment_status = PaymentStatus.PAID
def main() -> None:
test = OrderInformationHidingWithoutEncapsulation()
test.pay()
print("Is paid: ", test.is_paid())
if __name__ == "__main__":
main()Abstraction
Prereq: Inheritance
Abstraction is used to hide something too, but in a higher degree (class, module). Clients who use an abstract class (or interface) do not care about what it was, they just need to know what it can do.
Abstract class contains one or more abstract methods, and is considered a blueprint for other classes. It allows you to create a set of methods that must be created within any child classes built from the abstract class.
Abstract method is a method that has a declaration but does not have an implementation.
- An abstract class is a class that is declared abstract — it may or may not include abstract methods.
- Abstract classes cannot be instantiated, but they can be subclassed. This is the differentiation from Inheritance
- When an abstract class is subclassed, the subclass usually provides implementations for all of the abstract methods in its parent class
Be aware, Abstraction reduces code repetition but increases coupling.
https://www.geeksforgeeks.org/abstract-classes-in-python/
Working on Python Abstract classes
Here, This code defines an abstract base class called “Animal” using the ABC (Abstract Base Class) module in Python. The “Animal” class has a non-abstract method called “move” that does not have any implementation. There are four subclasses of “Animal” defined: “Human,” “Snake,” “Dog,” and “Lion.” Each of these subclasses overrides the “move” method and provides its own implementation by printing a specific movement characteristic.
Concrete classes contain only concrete (normal) methods whereas abstract classes may contain both concrete methods and abstract methods.
# abstract base class work
from abc import ABC, abstractmethod
class Animal(ABC):
def move(self):
pass
class Human(Animal):
def move(self):
print("I can walk and run")
class Snake(Animal):
def move(self):
print("I can crawl")
class Dog(Animal):
def move(self):
print("I can bark")
class Lion(Animal):
def move(self):
print("I can roar")
# Driver code
R = Human()
R.move()
K = Snake()
K.move()
R = Dog()
R.move()
K = Lion()
K.move()
Concrete Methods in Abstract Base Classes (Super)
Concrete classes contain only concrete (normal) methods whereas abstract classes may contain both concrete methods and abstract methods.
The concrete class provides an implementation of abstract methods, the abstract base class can also provide an implementation by invoking the methods via super(). Let look over the example to invoke the method using super():
# Python program invoking a
# method using super()
from abc import ABC
class R(ABC):
def rk(self):
print("Abstract Base Class")
class K(R):
def rk(self):
super().rk()
print("subclass ")
# Driver code
r = K()
r.rk()Abstract Base Class subclass
Abstract Property
- use the decorator to prevent users from calling abstract method
# Python program showing
# abstract properties
import abc
from abc import ABC, abstractmethod
class parent(ABC):
@abc.abstractproperty
def geeks(self):
return "parent class"
class child(parent):
@property
def geeks(self):
return "child class"
try:
r =parent()
print( r.geeks)
except Exception as err:
print (err)
r = child()
print (r.geeks)
Can't instantiate abstract class parent with abstract methods geeks child class
Protocol vs ABC
Inheritance
Inheritance is a mechanism that allows a class to inherit properties and behaviors from another class.
- PRO: Promotes code reuse and establishes relationships between classes.
- CON: Increases Coupling
Inheritance is based on a hierarchical relationship between classes, where a derived class (also known as a subclass or child class) inherits the characteristics of a base class (also known as a superclass or parent class). The derived class extends the functionality of the base class by adding new features or overriding existing ones.
The key idea behind inheritance is that the derived class inherits all the attributes (data members) and behaviors (methods) of the base class, and it can also introduce its own specific attributes and behaviors. This allows for creating a hierarchy of classes with increasing specialization.
Template
class parent_class:
body of parent class
class child_class( parent_class):
body of child classPython Code:
class Car: #parent class
def __init__(self, name, mileage):
self.name = name
self.mileage = mileage
def description(self):
return f"The {self.name} car gives the mileage of {self.mileage}km/l"
class BMW(Car): #child class
pass
class Audi(Car): #child class
def audi_desc(self):
return "This is the description method of class Audi."
obj1 = BMW("BMW 7-series",39.53)
print(obj1.description())
obj2 = Audi("Audi A8 L",14)
print(obj2.description())
print(obj2.audi_desc())We can check the base or parent class of any class using a built-in class attribute __bases__
print(BMW.__bases__, Audi.__bases__)
As we can see here, the base class of both sub-classes is Car. Now, let’s see what happens when using __base__ with the parent class Car:
print( Car.__bases__ )Output:
Whenever we create a new class in Python 3.x, it is inherited from a built-in basic class called Object. In other words, the Object class is the root of all classes.
Forms of Inheritance
There are broadly five forms of inheritance in oops based on the involvement of parent and child classes.
Single Inheritance
This is a form of inheritance in which a class inherits only one parent class. This is the simple form of inheritance and hence, is also referred to as simple inheritance.
class Parent:
def f1(self):
print("Function of parent class.")
class Child(Parent):
def f2(self):
print("Function of child class.")
object1 = Child()
object1.f1()
object1.f2()Output:

Here oject1 is an instantiated object of class Child, which inherits the parent class ‘Parent’.
Multiple Inheritance
Avoid using multiple inheritance in Python. If you need to reuse code from multiple classes, you can use composition.
Multiple inheritances is when a class inherits more than one parent class. The child class, after inheriting properties from various parent classes, has access to all of its objects.
One of the main problems with multiple inheritance is the diamond problem. This occurs when a class inherits from two classes that both inherit from a third class. In this case, it is not clear which implementation of the method from the third class should be used.
When a class inherits from multiple classes, it can be difficult to track which methods and attributes are inherited from which class.
class Parent_1:
def f1(self):
print("Function of parent_1 class.")
class Parent_2:
def f2(self):
print("Function of parent_2 class.")
class Parent_3:
def f3(self):
print("function of parent_3 class.")
class Child(Parent_1, Parent_2, Parent_3):
def f4(self):
print("Function of child class.")
object_1 = Child()
object_1.f1()
object_1.f2()
object_1.f3()
object_1.f4()Output:

Here we have one Child class that inherits the properties of three-parent classes Parent_1, Parent_2, and Parent_3. All the classes have different functions, and all of the functions are called using the object of the Child class.
But suppose a child class inherits two classes having the same function:
class Parent_1:
def f1(self):
print("Function of parent_1 class.")
class Parent_2:
def f1(self):
print("Function of parent_2 class.")
class Child(Parent_1, Parent_2):
def f2(self):
print("Function of child class.")Here, the classes Parent_1 and Parent_2 have the same class methods, f1(). Now, when we create a new object of the child class and call f1() from it since the child class is inheriting both parent classes, what do you think should happen?
obj = Child()
obj.f1()Output:

So in the above example, why was the function f1() of the class Parent_2 not inherited?
In multiple inheritances, the child class first searches for the method in its own class. If not found, then it searches in the parent classes depth_first and left-right order. Since this was an easy example with just two parent classes, we can clearly see that class Parent_1 was inherited first, so the child class will search the method in Parent_1 class before searching in class Parent_2.
But for complicated inheritance oops problems, it gets tough to identify the order. So the actual way of doing this is called Method Resolution Order (MRO) in Python. We can find the MRO of any class using the attribute __mro__.
Child.__mro__Output:

This tells that the Child class first visited the class Parent_1 and then Parent_2, so the f1() method of Parent_1 will be called.
Let’s take a bit complicated example in Python:
class Parent_1:
pass
class Parent_2:
pass
class Parent_3:
pass
class Child_1(Parent_1,Parent_2):
pass
class Child_2(Parent_2,Parent_3):
pass
class Child_3(Child_1,Child_2,Parent_3):
passHere, the class Child_1 inherits two classes – Parent_1 and Parent_2. The class Child_2 is also inheriting two classes – Parent_2 and Parent_3. Another class, Child_3, is inheriting three classes – Child_1, Child_2, and Parent_3.
Now, just by looking at this inheritance, it is quite hard to determine the Method Resolution Order for class Child_3. So here is the actual use of __mro__.
Child_3.__mro__Output:

We can see that, first, the interpreter searches Child_3, then Child_1, followed by Parent_1, Child_2, Parent_2, and Parent_3, respectively.
Multi-level Inheritance
For example, a class_1 is inherited by a class_2, and this class_2 also gets inherited by class_3, and this process goes on. This is known as multi-level inheritance oops. Let’s understand with an example:
class Parent:
def f1(self):
print("Function of parent class.")
class Child_1(Parent):
def f2(self):
print("Function of child_1 class.")
class Child_2(Child_1):
def f3(self):
print("Function of child_2 class.")
obj_1 = Child_1()
obj_2 = Child_2()
obj_1.f1()
obj_1.f2()
print("\n")
obj_2.f1()
obj_2.f2()
obj_2.f3()Output:

Here, the class Child_1 inherits the Parent class, and the class Child_2 inherits the class Child_1. In this Child_1 has access to functions f1() and f2() whereas Child_2 has access to functions f1(), f2() and f3(). If we try to access the function f3() using the object of class Class_1, then an error will occur stating:
‘Child_1’ object has no attribute ‘f3’.
obj_1.f3()
Hierarchical Inheritance
In this, various Child classes inherit a single Parent class. The example given in the introduction of the inheritance is an example of Hierarchical inheritance since classes BMW and Audi inherit class Car.
For simplicity, let’s look at another example:
class Parent:
deff1(self):
print("Function of parent class.")
class Child_1(Parent):
deff2(self):
print("Function of child_1 class.")
class Child_2(Parent):
deff3(self):
print("Function of child_2 class.")
obj_1 = Child_1()
obj_2 = Child_2()
obj_1.f1()
obj_1.f2()
print('\n')
obj_2.f1()
obj_2.f3()Output:

Here two child classes inherit the same parent class. The class Child_1 has access to functions f1() of the parent class and function f2() of itself. Whereas the class Child_2 has access to functions f1() of the parent class and function f3() of itself.
Hybrid Inheritance
When there is a combination of more than one form of inheritance, it is known as hybrid inheritance. It will be more clear after this example:
class Parent:
def f1(self):
print("Function of parent class.")
class Child_1(Parent):
def f2(self):
print("Function of child_1 class.")
class Child_2(Parent):
def f3(self):
print("Function of child_2 class.")
class Child_3(Child_1, Child_2):
def f4(self):
print("Function of child_3 class.")
obj = Child_3()
obj.f1()
obj.f2()
obj.f3()
obj.f4()Output:

In this example, two classes, ‘Child_1′ and ‘Child_2’, are derived from the base class ‘Parent’ using hierarchical inheritance. Another class, ‘Child_3’, is derived from classes ‘Child_1’ and ‘Child_2’ using multiple inheritances. The class ‘Child_3’ is now derived using hybrid inheritance.
Method Overriding in Inheritance in Python
We do this so we can have our own methods without modifying the base class. If we modify the base class, then that could lead to other problems if other users are expecting certain functionality from the said base class
The concept of overriding is very important in inheritance oops. It gives the special ability to the child/subclasses to provide specific implementation to a method that is already present in their parent classes.
class Parent:
def f1(self):
print("Function of Parent class.")
class Child(Parent):
def f1(self):
print("Function of Child class.")
obj = Child()
obj.f1()Output:

Here the function f1() of the child class has overridden the function f1() of the parent class. Whenever the object of the child class invokes f1(), the function of the child class gets executed. However, the object of the parent class can invoke the function f1() of the parent class.
obj_2 = Parent()
obj_2.f1()Output:

Super() Function in Python
The super() function in Python returns a proxy object that references the parent class using the super keyword. This super() keyword is basically useful in accessing the overridden methods of the parent class.
The official documentation of the super() function sites two main uses of super():
In a class hierarchy with single inheritance oops, super helps to refer to the parent classes without naming them explicitly, thus making the code more maintainable.
For example:
class Parent:
def f1(self):
print("Function of Parent class.")
class Child(Parent):
def f1(self):
super().f1()
print("Function of Child class.")
obj = Child()
obj.f1()Output:

Here, with the help of super().f1(), the f1() method of the superclass of the child class, i.e., the parent class, has been called without explicitly naming it.
One thing to note here is that the super() class can accept two parameters- the first is the name of the subclass, and the second is an object that is an instance of that subclass. Let’s see how:
class Parent:
def f1(self):
print("Function of Parent class.")
class Child(Parent):
def f1(self):
super( Child, self ).f1()
print("Function of Child class.")
obj = Child()
obj.f1()Output:

The first parameter refers to the subclass Child, while the second parameter refers to the object of Child, which, in this case, is self. You can see the output after using super(), and super( Child, self) is the same because, in Python 3, super( Child, self) is equivalent to self().
Now let’s see one more example using the __init__ function.
class Parent(object):
def__init__(self, ParentName):
print(ParentName, 'is derived from another class.')
class Child(Parent):
def__init__(self, ChildName):
print(name,'is a sub-class.')
super().__init__(ChildName)
obj = Child('Child')Output:

What we have done here is that we called the __init__ function of the parent class (inside the child class) using super().__init__( ChildName ). And as the __init__ method of the parent class requires one argument, it has been passed as “ChildName”. So after creating the object of the child class, first, the __init__ function of the child class got executed, and after that, the __init__ function of the parent class.
The second use case is to support multiple cooperative inheritances in a dynamic execution environment.
class First():
def __init__(self):
print("first")
super().__init__()
class Second():
def __init__(self):
print("second")
super().__init__()
class Third(Second, First):
def __init__(self):
print("third")
super().__init__()
obj = Third()Output:

The super() call finds the next method in the MRO at each step, which is why First and Second have to have it, too; otherwise, execution stops at the end of first().__init__.
Note that the super-class of both First and Second is Object.
Let’s find the MRO of Third() as well.
Third.__mro__Output:

The order is Third > Second > First, and the same is the order of our output.
Polymorphism
Class Polymorphism
Polymorphism is often used in Class methods, where we can have multiple classes with the same method name.
For example, say we have three classes: Car, Boat, and Plane, and they all have a method called move():
Different classes with the same method:
class Car:
def __init__(self, brand, model):
self.brand = brand
self.model = model
def move(self):
print("Drive!")
class Boat:
def __init__(self, brand, model):
self.brand = brand
self.model = model
def move(self):
print("Sail!")
class Plane:
def __init__(self, brand, model):
self.brand = brand
self.model = model
def move(self):
print("Fly!")
car1 = Car("Ford", "Mustang") #Create a Car class
boat1 = Boat("Ibiza", "Touring 20") #Create a Boat class
plane1 = Plane("Boeing", "747") #Create a Plane class
for x in (car1, boat1, plane1):
x.move()Inheritance Class Polymorphism
What about classes with child classes with the same name? Can we use polymorphism there?
Yes. If we use the example above and make a parent class called Vehicle, and make Car, Boat, Plane child classes of Vehicle, the child classes inherits the Vehicle methods, but can override them:
class Vehicle:
def __init__(self, brand, model):
self.brand = brand
self.model = model
def move(self):
print("Move!")
class Car(Vehicle):
pass
class Boat(Vehicle):
def move(self):
print("Sail!")
class Plane(Vehicle):
def move(self):
print("Fly!")
car1 = Car("Ford", "Mustang") #Create a Car object
boat1 = Boat("Ibiza", "Touring 20") #Create a Boat object
plane1 = Plane("Boeing", "747") #Create a Plane object
for x in (car1, boat1, plane1):
print(x.brand)
print(x.model)
x.move()
Built-in Methods
Instance Method vs Static Method
Instance Methods (normal methods without declaring @) specifies with that particular declared instance. For ex. a unique event is specific to a specific calendar instance, and should not exist on other calendar instances.
Static Method doesn't care about any particular instance. For ex, a weekend on a calendar applies to all calendars since it is universally agreed upon how calendars work, regardless of instance
Also look into Class Method if need to consider inheritance.
class Calendar:
def __init__(self):
self.events = []
def add_event(self, event):
self.events.append(event)
@staticmethod
def is_weekend(dt):
passDataclasses
Without using Dataclass,
- If you print, it will be the memory address where the object resides.
- To print a string, will have to modify the _str_ dunder method
- A new object with identical information will be a new object
class Person:
def __init__(self, name, job, age):
self.name = name
self.job = job
self.age = age
person1 = Person("Geralt", "Witcher", 30)
person2 = Person("Yennefer", "Sorceress", 25)
person3 = Person("Yennefer", "Sorceress", 25)
print(id(person2))
print(id(person3))
print(person1)
print(person3 == person2)
"""
OUTPUT:
140244722433808
140244722433712
<__main__.Person object at 0x7f8d44dcbfd0>
False
"""With Dataclass:
- Print string information instead of object, unless using id()
- A new object will still be a new object, but if information is identical it will it will return True
- If forgot to write @dataclass...
- class variables instead of instance variables
from dataclasses import dataclass, field
@dataclass(order=True,frozen=False)
class Person:
sort_index: int = field(init=False, repr=False)
name: str
job: str
age: int
strength: int = 100
def __post_init__(self):
object.__setattr__(self, 'sort_index', self.strength)
def __str__(self):
return f'{self.name}, {self.job} ({self.age})'
person1 = Person("Geralt", "Witcher", 30, 99)
person2 = Person("Yennefer", "Sorceress", 25)
person3 = Person("Yennefer", "Sorceress", 25)
print(person1)
print(id(person2))
print(id(person3))
print(person3 == person2)
print(person1 > person2)
"""
Geralt, Witcher (30)
140120080908048
140120080907856
True
False
"""https://www.youtube.com/watch?v=CvQ7e6yUtnw&t=389s
Class Creation: Getter/Setter vs Property
Getter and Setter Pattern comes from OOP languages such as C++ and Java in order to adhere to
- Encapsulation
- the bundling of data/attributes and methods.
- restricting access to implementation details and violating state invariants
In Python it is considered unpythonic. Instead, use @property decorator instead
Class without Getter and Setter
# Basic method of setting and getting attributes in Python
# If this class had no methods, and only an __init__, then this would be fine.
# This has no Encapsulation because it directly accesses the attributes
class Celsius:
def __init__(self, temperature=0):
self.temperature = temperature
def to_fahrenheit(self):
return (self.temperature * 1.8) + 32
# Create a new object
human = Celsius()
# Set the temperature
human.temperature = 37
# Get the temperature attribute
print(human.temperature)
# Get the to_fahrenheit method
print(human.to_fahrenheit())
>> 37
>> 98.60000000000001Getter and Setter Pattern
- Class Attributes...
- are variables where you can access through the instance, class, or both.
- holds an internal state.
- Two ways to access class attributes:
- Directly (breaks encapsulation)
- If accessed directly, they become part of Public API
- Only use if sure that no behavior (methods) will ever be attached to the variables (@dataclass?)
- Changing implementation will be problematic:
- Converting stored attribute -> computed attribute. Want to be able to store attributes instead of recomputing each time
- No internal implementation
- Methods (ideal)
- Two methods to respect encapsulation
- Getter: Allows Access
- Setter: Allows Setting or Mutation
- Two methods to respect encapsulation
- Directly (breaks encapsulation)
- Implementation
- Making attributes Non-public
- use underscore in variable name ( _name )
- Writing Getter and Setter Methods for each attribute
- In a class, __init__ is the attributes (variables)
- Making attributes Non-public
# Making Getters and Setter methods
# PRO: Adheres to Encapsulation since get/set methods is used to change the attributes instead of direct access
# PRO: Adheres to a faux Information Hiding since converting temperature to _temperature, but no private/protected vars in Python
# CON: Has more code to change
class Celsius:
def __init__(self, temperature=0):
self.set_temperature(temperature)
def to_fahrenheit(self):
return (self.get_temperature() * 1.8) + 32
# getter method
def get_temperature(self):
return self._temperature
# setter method
def set_temperature(self, value):
if value < -273.15:
raise ValueError("Temperature below -273.15 is not possible.")
self._temperature = value
# Create a new object, set_temperature() internally called by __init__
human = Celsius(37)
# Get the temperature attribute via a getter
print(human.get_temperature())
# Get the to_fahrenheit method, get_temperature() called by the method itself
print(human.to_fahrenheit())
# new constraint implementation
human.set_temperature(-300)
# Get the to_fahreheit method
print(human.to_fahrenheit())
>> 37
>> 98.60000000000001
>> Traceback (most recent call last):
>> File "<string>", line 30, in <module>
>> File "<string>", line 16, in set_temperature
>> ValueError: Temperature below -273.15 is not possible.
Property Class
# using property class
class Celsius:
def __init__(self, temperature=0):
self.temperature = temperature
def to_fahrenheit(self):
return (self.temperature * 1.8) + 32
# getter
def get_temperature(self):
print("Getting value...")
return self._temperature
# setter
def set_temperature(self, value):
print("Setting value...")
if value < -273.15:
raise ValueError("Temperature below -273.15 is not possible")
self._temperature = value
# creating a property object
temperature = property(get_temperature, set_temperature)
human = Celsius(37)
print(human.temperature)
print(human.to_fahrenheit())
human.temperature = -300The reason is that when an object is created, the __init__() method gets called. This method has the line self.temperature = temperature. This expression automatically calls set_temperature().
Similarly, any access like c.temperature automatically calls get_temperature(). This is what property does.
By using property, we can see that no modification is required in the implementation of the value constraint. Thus, our implementation is backward compatible.
The @property Decorator
In Python, property() is a built-in function that creates and returns a property object. The syntax of this function is:
property(fget=None, fset=None, fdel=None, doc=None)Here,
fgetis function to get value of the attributefsetis function to set value of the attributefdelis function to delete the attributedocis a string (like a comment)
As seen from the implementation, these function arguments are optional.
A property object has three methods, getter(), setter(), and deleter() to specify fget, fset and fdel at a later point. This means, the line:
temperature = property(get_temperature,set_temperature)can be broken down as:
# make empty property
temperature = property()
# assign fget
temperature = temperature.getter(get_temperature)
# assign fset
temperature = temperature.setter(set_temperature)These two pieces of code are equivalent.
Programmers familiar with Python Decorators can recognize that the above construct can be implemented as decorators.
We can even not define the names get_temperature and set_temperature as they are unnecessary and pollute the class namespace.
For this, we reuse the temperature name while defining our getter and setter functions. Let's look at how to implement this as a decorator:
# Using @property decorator
class Celsius:
def __init__(self, temperature=0):
self.temperature = temperature
def to_fahrenheit(self):
return (self.temperature * 1.8) + 32
@property
def temperature(self):
print("Getting value...")
return self._temperature
@temperature.setter
def temperature(self, value):
print("Setting value...")
if value < -273.15:
raise ValueError("Temperature below -273 is not possible")
self._temperature = value
# create an object
human = Celsius(37)
print(human.temperature)
print(human.to_fahrenheit())
coldest_thing = Celsius(-300)
>>Setting value...
>>Getting value...
>>37
>>Getting value...
>>98.60000000000001.
>>Setting value...
>>Traceback (most recent call last):
>> File "", line 29, in
>> File "", line 4, in __init__
>> File "", line 18, in temperature
>>ValueError: Temperature below -273 is not possible
Object Oriented Design Patterns
Creational
Creational design patterns are used to
- Create objects effectively
- Add flexibility to software design
Many designs start by using Factory Method (less complicated and more customizable via subclasses) and evolve toward Abstract Factory, Prototype, or Builder (more flexible, but more complicated).
Factory Pattern
-
- Object Creation without Exposing Concrete Classes:
- Factories provide a centralized way to create objects, allowing for better encapsulation and abstraction.
- Dynamic Object Creation:
- Factories are useful when the exact class of the object to be created may vary at runtime based on certain conditions or configurations.
- Factories can select the appropriate subclass or implementation to create based on these conditions.
- Polymorphic Object Creation:
- Allowing clients to create objects without knowing the specific subclass or implementation being instantiated.
- This promotes loose coupling and simplifies client code.
- Difference to Dependency Injection:
- When using a factory your code is still actually responsible for creating objects. By DI you outsource that responsibility to another class or a framework, which is separate from your code.
- Object Creation without Exposing Concrete Classes:
class Burger:
def __init__(self, ingredients):
self.ingredients = ingredients
def print(self):
print(self.ingredients)
class BurgerFactory:
def createCheeseBurger(self):
ingredients = ["bun", "cheese", "beef-patty"]
return Burger(ingredients)
def createDeluxeCheeseBurger(self):
ingredients = ["bun", "tomatoe", "lettuce", "cheese", "beef-patty"]
return Burger(ingredients)
def createVeganBurger(self):
ingredients = ["bun", "special-sauce", "veggie-patty"]
return Burger(ingredients)
burgerFactory = BurgerFactory()
burgerFactory.createCheeseBurger().print()
burgerFactory.createDeluxeCheeseBurger().print()
burgerFactory.createVeganBurger().print()
Output
['bun', 'cheese', 'beef-patty']
['bun', 'tomatoe', 'lettuce', 'cheese', 'beef-patty']
['bun', 'special-sauce', 'veggie-patty']
Builder Pattern
class Burger:
def __init__(self):
self.buns = None
self.patty = None
self.cheese = None
def setBuns(self, bunStyle):
self.buns = bunStyle
def setPatty(self, pattyStyle):
self.patty = pattyStyle
def setCheese(self, cheeseStyle):
self.cheese = cheeseStyle
class BurgerBuilder:
def __init__(self):
self.burger = Burger()
def addBuns(self, bunStyle):
self.burger.setBuns(bunStyle)
return self
def addPatty(self, pattyStyle):
self.burger.setPatty(pattyStyle)
return self
def addCheese(self, cheeseStyle):
self.burger.setCheese(cheeseStyle)
return self
def build(self):
return self.burger
burger = BurgerBuilder() \
.addBuns("sesame") \
.addPatty("fish-patty") \
.addCheese("swiss cheese") \
.build()
Singleton
Singleton Pattern is considered unpythonic
https://www.youtube.com/watch?v=Rm4JP7JfsKY&t=634s
Why it is bad:
- If you inherit from it, you can get multiple instances, which shouldn't be allowed.
- Testing code is hard with singleton because you cannot create multiple fresh instances for testing
- Does not work well with multi threaded applications because raise condition of
class ApplicationState:
instance = None
def __init__(self):
self.isLoggedIn = False
@staticmethod
def getAppState():
if not ApplicationState.instance:
ApplicationState.instance = ApplicationState()
return ApplicationState.instance
appState1 = ApplicationState.getAppState()
print(appState1.isLoggedIn)
appState2 = ApplicationState.getAppState()
appState1.isLoggedIn = True
print(appState1.isLoggedIn)
print(appState2.isLoggedIn)
>> False
>> True
>> TrueBehavourial
Observer / PubSub
It's common for different components of an app to respond to events or state changes, but how can we communicate these events?
The Observer pattern is a popular solution. We have a Subject (aka Publisher) which will be the source of events. And we could have multiple Observers (aka Subscribers) which will recieve events from the Subject in realtime.
class YoutubeChannel:
def __init__(self, name):
self.name = name
self.subscribers = []
def subscribe(self, sub):
self.subscribers.append(sub)
def notify(self, event):
for sub in self.subscribers:
sub.sendNotification(self.name, event)
from abc import ABC, abstractmethod
class YoutubeSubscriber(ABC):
@abstractmethod
def sendNotification(self, event):
pass
class YoutubeUser(YoutubeSubscriber):
def __init__(self, name):
self.name = name
def sendNotification(self, channel, event):
print(f"User {self.name} received notification from {channel}: {event}")
channel = YoutubeChannel("neetcode")
channel.subscribe(YoutubeUser("sub1"))
channel.subscribe(YoutubeUser("sub2"))
channel.subscribe(YoutubeUser("sub3"))
channel.notify("A new video released")
In this case we have multiple Subscribers listening to a single published. But users could also be subscribed to multiple channels.
Since the Publishers & Subscribers don't have to worry about each others' implementations, they are loosely coupled.
User sub1 received notification from neetcode: A new video released
User sub2 received notification from neetcode: A new video released
User sub3 received notification from neetcode: A new video released
Iterator
Many objects in python have built-in iterators. That's why we can conveniently iterate through an array using the key word in.
myList = [1, 2, 3]
for n in myList:
print(n)
Output
1
2
3
For more complex objects, like Linked Lists or Binary Search Trees, we can define our own iterators.
class ListNode:
def __init__(self, val):
self.val = val
self.next = None
class LinkedList:
def __init__(self, head):
self.head = head
self.cur = None
# Define Iterator
def __iter__(self):
self.cur = self.head
return self
# Iterate
def __next__(self):
if self.cur:
val = self.cur.val
self.cur = self.cur.next
return val
else:
raise StopIteration
# Initialize LinkedList
head = ListNode(1)
head.next = ListNode(2)
head.next.next = ListNode(3)
myList = LinkedList(head)
# Iterate through LinkedList
for n in myList:
print(n)
Output
1
2
3
Strategy
A Class may have different behaviour, or invoke a different method based on something we define (i.e. a Strategy). For example, we can filter an array by removing positive values; or we could filter it by removing all odd values. These are two filtering strategies we could implement, but we could add many more.
from abc import ABC, abstractmethod
class FilterStrategy(ABC):
@abstractmethod
def removeValue(self, val):
pass
class RemoveNegativeStrategy(FilterStrategy):
def removeValue(self, val):
return val < 0
class RemoveOddStrategy(FilterStrategy):
def removeValue(self, val):
return abs(val) % 2
class Values:
def __init__(self, vals):
self.vals = vals
def filter(self, strategy):
res = []
for n in self.vals:
if not strategy.removeValue(n):
res.append(n)
return res
values = Values([-7, -4, -1, 0, 2, 6, 9])
print(values.filter(RemoveNegativeStrategy()))
print(values.filter(RemoveOddStrategy()))
Output
[0, 2, 6, 9]
[-4, 0, 2, 6]
A common alternative to this pattern is to simply pass in an inline / lambda function, which allows us to extend the behaviour of a method or class.
State Machines
When to use it?
State management is often part of a framework already, so building from scratch is rare. Different classes such as below can denote different states, but more pythonic way is to use different modules and functions, where each module can denote a different state. Can be used in such example like a "simple" and "advanced" mode of a GUI.
from dataclasses import dataclass
from typing import Protocol
class DocumentState(Protocol):
def edit(self):
...
def review(self):
...
def finalize(self):
...
class DocumentContext(Protocol):
content: list[str]
def set_state(self, state: DocumentState) -> None:
...
def edit(self):
...
def review(self):
...
def finalize(self):
...
def show_content(self):
...
@dataclass
class Draft:
document: DocumentContext
def edit(self):
print("Editing the document...")
self.document.content.append("Edited content.")
def review(self):
print("The document is now under review.")
self.document.set_state(Reviewed(self.document))
def finalize(self):
print("You need to review the document before finalizing.")
@dataclass
class Reviewed:
document: DocumentContext
def edit(self):
print("The document is under review, cannot edit now.")
def review(self):
print("The document is already reviewed.")
def finalize(self):
print("Finalizing the document...")
self.document.set_state(Finalized(self.document))
@dataclass
class Finalized:
document: DocumentContext
def edit(self):
print("The document is finalized. Editing is not allowed.")
def review(self):
print("The document is finalized. Review is not possible.")
def finalize(self):
print("The document is already finalized.")
class Document:
def __init__(self):
self.state: DocumentState = Draft(self)
self.content: list[str] = []
def set_state(self, state: DocumentState):
self.state = state
def edit(self):
self.state.edit()
def review(self):
self.state.review()
def finalize(self):
self.state.finalize()
def show_content(self):
print("Document content:", " ".join(self.content))
def main() -> None:
document = Document()
document.edit() # Expected: "Editing the document..."
document.show_content() # Expected: "Document content: Edited content."
document.finalize() # Expected: "You need to review the document before finalizing."
document.review() # Expected: "The document is now under review."
document.edit() # Expected: "The document is under review, cannot edit now."
document.finalize() # Expected: "Finalizing the document..."
document.edit() # Expected: "The document is finalized. Editing is not allowed."
if __name__ == "__main__":
main()Structural
Structural Patterns
Focused on how objects and classes can be composed to form larger structures while keeping these structures flexible and efficient. These patterns deal with object composition and relationships between classes or objects. They help in building a flexible and reusable codebase by promoting better organization and modularity.
Facade
According to Oxford Languages, a Facade is
an outward appearance that is maintained to conceal a less pleasant or creditable reality.
In the programming world, the "outward appearance" is the class or interface we interact with as programmers. And the "less pleasant reality" is the complexity that is hidden from us.
So a Facade, is simply a wrapper class that can be used to abstract lower-level details that we don't want to worry about.
# Python arrays are dynamic by default, but this is an example of resizing.
class Array:
def __init__(self):
self.capacity = 2
self.length = 0
self.arr = [0] * 2 # Array of capacity = 2
# Insert n in the last position of the array
def pushback(self, n):
if self.length == self.capacity:
self.resize()
# insert at next empty position
self.arr[self.length] = n
self.length += 1
def resize(self):
# Create new array of double capacity
self.capacity = 2 * self.capacity
newArr = [0] * self.capacity
# Copy elements to newArr
for i in range(self.length):
newArr[i] = self.arr[i]
self.arr = newArr
# Remove the last element in the array
def popback(self):
if self.length > 0:
self.length -= 1
Adapter Pattern (Wrapper)
Adapter Pattern allow incompatible objects to be used together.
This supports Composition over Inheritance and Open-Closed Principle. Instead of modifying the base class, we extend the class behavior
Adapter is used when refactoring code, would never consider an adapter pattern from the start.
If a MicroUsbCable class is initially incompatible with UsbPort, we can create a adapter/wrapper class, which makes them compatible. In this case, a MicroToUsbAdapter makes them compatible, similar to how we use adapters in the real-world.
class UsbCable:
def __init__(self):
self.isPlugged = False
def plugUsb(self):
self.isPlugged = True
class UsbPort:
def __init__(self):
self.portAvailable = True
def plug(self, usb):
if self.portAvailable:
usb.plugUsb()
self.portAvailable = False
# UsbCables can plug directly into Usb ports
usbCable = UsbCable()
usbPort1 = UsbPort()
usbPort1.plug(usbCable)
class MicroUsbCable:
def __init__(self):
self.isPlugged = False
def plugMicroUsb(self):
self.isPlugged = True
class MicroToUsbAdapter(UsbCable):
def __init__(self, microUsbCable):
self.microUsbCable = microUsbCable
self.microUsbCable.plugMicroUsb()
# can override UsbCable.plugUsb() if needed
# MicroUsbCables can plug into Usb ports via an adapter
microToUsbAdapter = MicroToUsbAdapter(MicroUsbCable())
usbPort2 = UsbPort()
usbPort2.plug(microToUsbAdapter)
Architectural
Monolith
A monolithic architecture is an architectural pattern where all components of an application are combined into a single codebase and deployed as a single unit. In a monolithic design pattern:
-
Codebase: All the application's functionalities, including the user interface, business logic, and data access code, are packaged together into a single codebase.
-
Deployment: The entire application is deployed as a single unit, typically on a single server or a set of servers.
-
Communication: Communication between different components of the application typically occurs through function calls or method invocations within the same process.
-
Scalability: Scaling a monolithic application involves scaling the entire application, which can be challenging as it requires replicating the entire application stack.
Monolithic architectures are often simpler to develop and deploy initially, especially for small to medium-sized applications. They offer advantages such as ease of development, debugging, and testing, as well as simpler deployment and management.
However, as applications grow in complexity and scale, monolithic architectures can become harder to maintain and scale. They may suffer from issues such as tight coupling between components, limited scalability, and difficulty in adopting new technologies or frameworks.
In contrast, microservices architecture, where an application is decomposed into smaller, independently deployable services, offers benefits such as improved scalability, flexibility, and maintainability. However, microservices come with their own set of challenges, such as increased complexity in managing distributed systems and communication overhead between services.
Ultimately, the choice between monolithic and microservices architectures depends on factors such as the size and complexity of the application, scalability requirements, development team expertise, and organizational constraints.
Model View Controller
The MVC architecture is very broad and can change depending on the programming language and type of application you are doing, so in this case, yes your approach can be accepted as correct.
What I have learned from static typed languages is that you define the model and views as complete separate entities, and the controller takes an instance of both model and views as parameters.
What you need to ask yourself to define if your app is MVC is the following:
- If I change something in the view do I break anything in the model?
- If I change something in the model do I break anything in the view?
- Is the controller communicating everything in both view and model so that they don't have to communicate with each other?
If nothing breaks and the controller does all of the communication then yes, your application is MVC.
You might want to look into design patterns such as Singleton, Factory and others that all use the MVC architecture and define ways to implement it.
Microservices
Others
Event-Driven Architecture (EDA) and Service-Oriented Architecture (SOA) are both architectural patterns used in software design, but they have different approaches and focus areas. Here's a comparison between the two:
-
Communication Paradigm:
- EDA: In Event-Driven Architecture, communication between components is based on events. Components publish events when certain actions or changes occur, and other components subscribe to these events and react accordingly. This asynchronous communication model allows for loose coupling between components and enables real-time responsiveness.
- SOA: In Service-Oriented Architecture, communication between components is typically based on service interfaces. Services expose their functionality through well-defined interfaces (APIs) that other services or clients can invoke. Communication in SOA is often synchronous, although asynchronous messaging can also be used.
-
Granularity:
- EDA: EDA tends to be more fine-grained, with events representing specific actions or changes within the system. Components can react to individual events and perform specific actions accordingly.
- SOA: SOA can vary in granularity, but services tend to encapsulate larger units of functionality. Services are typically designed to represent business capabilities or domain entities, providing coarse-grained operations.
-
Flexibility:
- EDA: EDA offers greater flexibility and agility, as components can react to events in a dynamic and decentralized manner. New components can be added or existing components modified without affecting the overall system.
- SOA: SOA also provides flexibility, but to a lesser extent compared to EDA. Changes to services may require coordination between service providers and consumers, and service contracts need to be carefully managed to ensure compatibility.
-
Scalability:
- EDA: EDA inherently supports scalability, as components can be scaled independently based on event processing requirements. Event-driven systems can handle bursts of traffic more gracefully by distributing processing across multiple instances.
- SOA: SOA can be scalable, but scaling individual services may not always be straightforward, especially if services have dependencies or shared resources.
-
Complexity:
- EDA: EDA can introduce complexity, particularly in managing event propagation, event schemas, and ensuring event consistency across components. Event-driven systems may also require additional infrastructure for event processing and management.
- SOA: SOA tends to be less complex compared to EDA, as services have well-defined interfaces and interactions. However, managing service contracts, versioning, and service discovery can still introduce complexity, especially in large-scale deployments.
In summary, Event-Driven Architecture is well-suited for scenarios where real-time responsiveness, loose coupling, and flexibility are paramount, while Service-Oriented Architecture provides a more structured approach to building distributed systems with reusable and interoperable services. The choice between EDA and SOA depends on the specific requirements, constraints, and trade-offs of the application or system being designed.
Object Oriented Design Interviews
Model a real world problem with Object Oriented Design techniques and concepts. Often called Low Level System Design
Good Engineering Principles
General Engineering Principles
-
DRY (Don't Repeat Yourself):
-
Avoid duplication of code
-
Abstract common functionalities into reusable components or functions.
-
-
Emphasis on modularity and maintainability.
-
-
KISS (Keep It Simple, Stupid):
-
Complex solutions should be avoided in favor of simpler, more straightforward ones whenever possible.
-
-
YAGNI (You Aren't Gonna Need It):'
-
Only implement features that are necessary based on current requirements, and do not "over engineer"
-
-
Separation of Concerns (SoC):
-
Divide the software into distinct sections, with each section addressing a separate concern or responsibility.
-
Promotes modularity, maintainability, reusability, flexibility, and loose coupling between components
-
-
Single Source of Truth (SSOT):
-
Store each piece of information (like config files) in the system in a single location.
-
Reduces the risk of data inconsistencies.
-
-
Fail-Fast Principle:
-
Identify and report errors as soon as they occur rather than allowing them to propagate and potentially cause more significant issues later on.
-
Helps in diagnosing and fixing problems quickly.
-
Dependency Injection Design Pattern
If a class uses an object of a certain type, we are NOT also responsible for creating the object.
Providing the objects that an object needs (its dependencies) instead of having it construct them itself.
Dependency injection (Inversion of Control Technique) is a principle that helps to decrease coupling and increase cohesion.

What is coupling and cohesion?
Coupling and cohesion are about how tough the components are tied.
-
High coupling. If the coupling is high it’s like using superglue or welding. No easy way to disassemble.
-
High cohesion. High cohesion is like using screws. Quite easy to disassemble and re-assemble in a different way. It is an opposite to high coupling.
Cohesion often correlates with coupling. Higher cohesion usually leads to lower coupling and vice versa.
Low coupling brings flexibility. Your code becomes easier to change and test.
-
- Dependency:
- When an object type and its class is coupled (has-a relationship). Ex.
- Class could depend on another class could it has an attribute of that type
- Object of that type is passed as a parameter to a method
- Class inherits from another class, the strongest dependency since it uses
-
Flexibility. The components are loosely coupled. You can easily extend or change the functionality of a system by combining the components in a different way. You even can do it on the fly.
-
Testability. Testing is easier because you can easily inject mocks instead of real objects that use API or database, etc.
-
Clearness and maintainability. Dependency injection helps you reveal the dependencies. Implicit becomes explicit. And “Explicit is better than implicit” (PEP 20 - The Zen of Python). You have all the components and dependencies defined explicitly in a container. This provides an overview and control of the application structure. It is easier to understand and change it.
- When an object type and its class is coupled (has-a relationship). Ex.
- Dependency:
Before:
import os
class ApiClient:
def __init__(self) -> None:
self.api_key = os.getenv("API_KEY") # <-- dependency
self.timeout = int(os.getenv("TIMEOUT")) # <-- dependency
class Service:
def __init__(self) -> None:
self.api_client = ApiClient() # <-- dependency
def main() -> None:
service = Service() # <-- dependency
...
if __name__ == "__main__":
main()
After:
import os
class ApiClient:
def __init__(self, api_key: str, timeout: int) -> None:
self.api_key = api_key # <-- dependency is injected
self.timeout = timeout # <-- dependency is injected
class Service:
def __init__(self, api_client: ApiClient) -> None:
self.api_client = api_client # <-- dependency is injected
def main(service: Service) -> None: # <-- dependency is injected
...
if __name__ == "__main__":
main(
service=Service(
api_client=ApiClient(
api_key=os.getenv("API_KEY"),
timeout=int(os.getenv("TIMEOUT")),
),
),
)
ApiClient is decoupled from knowing where the options come from. You can read a key and a timeout from a configuration file or even get them from a database.
Service is decoupled from the ApiClient. It does not create it anymore. You can provide a stub or other compatible object.
Function main() is decoupled from Service. It receives it as an argument.
Flexibility comes with a price.
Now you need to assemble and inject the objects like this:
main(
service=Service(
api_client=ApiClient(
api_key=os.getenv("API_KEY"),
timeout=int(os.getenv("TIMEOUT")),
),
),
)
The assembly code might get duplicated and it’ll become harder to change the application structure.
Law of Demeter / Principle of Least Knowledge:
- Module should have limited knowledge about other modules.
- Encourages encapsulation and loose coupling by restricting the interaction between objects.
- Method in an object should only call:
- Itself
- Its parameters
- Object it creates
- Its direct component objects
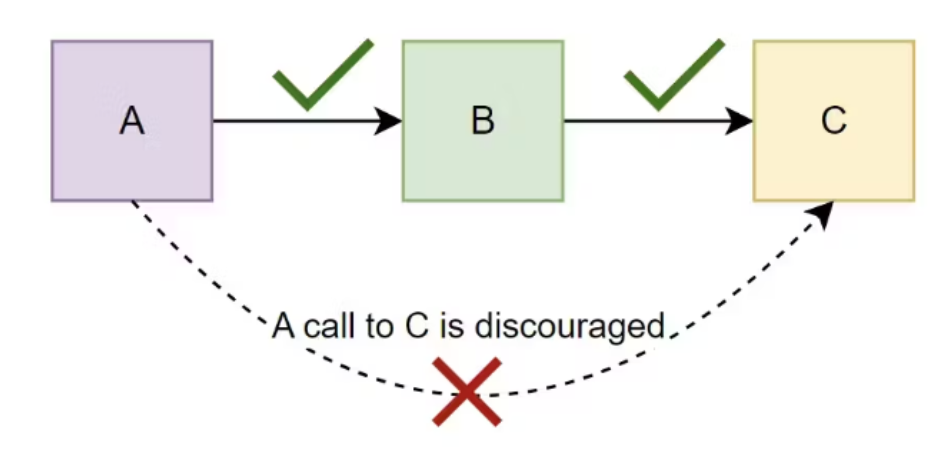
Violates Law of Demeter due to nesting:
data = {
"containers": [
{"scoops": [{"flavor": "chocolate"}, {"flavor": "vanilla"}]},
{"scoops": [{"flavor": "strawberry"}, {"flavor": "mint"}]}
]
}
flavor = data["containers"][0]["scoops"][0]["flavor"]Fix:
- Create a class that represents the container structure. And,
- Provide methods to access our inner data.
class Scoop:
def __init__(self, flavor:str):
self.flavor = flavor
def get_flavor(self):
return self.flavor
class Container:
def __init__(self):
self.scoops = []
def add_scoop(self,flavor:str):
self.scoops.append(Scoop(flavor))
def get_flavor_of_scoop(self, index:int):
return self.scoops[index].get_flavor()
data = Container()
data.add_scoop("chocolate")
data.add_scoop("vanilla")
flavor = data.get_flavor_of_scoop(0)Object Oriented Design Principles
Solid Principles
Single Responsibility Principle (SRP):

- A class should have only one reason to change.
- The following handles both read/write of files and encryption, which violates SRP
class FileManager:
def __init__(self, file_path):
self.file_path = file_path
def read_file(self):
pass
def write_file(self, data):
pass
def encrypt_data(self, data):
pass
def decrypt_data(self, data):
pass- In this refactored version, the `FileManager` class now focuses solely on file management operations.
class FileManager
def __init__(self, file_path):
self.file_path = file_path
def read_file(self):
pass
def write_file(self, data):
pass
class DataEncryptor:
def encrypt_data(self, data):
pass
def decrypt_data(self, data):
pass Open/Closed Principle (OCP):

Software entities (classes, modules, functions, etc.) should be open for extension but closed for modification.
The function animal_sound does not conform because it cannot be closed against new kinds of animals. If we add a new animal, Snake, We have to modify the animal_sound function. For every new animal, a new logic is added to the animal_sound function.
When your application grows in complexity, the if statement would be repeated in the animal_sound function each time a new animal is added, all over the application. We want to decrease amount of if else statements.
class Animal:
def __init__(self, name: str):
self.name = name
def get_name(self) -> str:
pass
animals = [
Animal('lion'),
Animal('mouse')
]
def animal_sound(animals: list):
for animal in animals:
if animal.name == 'lion':
print('roar')
elif animal.name == 'mouse':
print('squeak')
animal_sound(animals):The Animal class has been enhanced with the addition of the make_sound method. Each animal class extends the Animal class and provides its own implementation of the make_sound method, defining how it produces its unique sound.
In the animal_sound function, we iterate through the array of animals and simply invoke their respective make_sound methods. The animal_sound function remains unchanged even when new animals are introduced. We only need to include the new animal in the animal array.
This adherence to the Open-Closed Principle ensures that the code is extensible without requiring modifications to existing code.
class Animal:
def __init__(self, name: str):
self.name = name
def get_name(self) -> str:
pass
def make_sound(self):
pass
class Lion(Animal):
def make_sound(self):
return 'roar'
class Mouse(Animal):
def make_sound(self):
return 'squeak'
class Snake(Animal):
def make_sound(self):
return 'hiss'
def animal_sound(animals: list):
for animal in animals:
print(animal.make_sound())
animal_sound(animals):Liskov Substitution Principle:
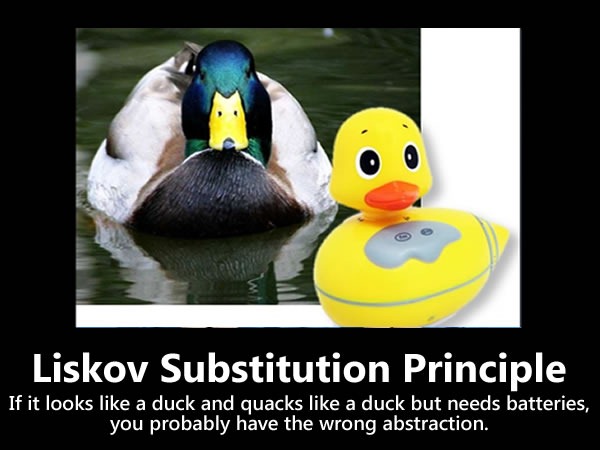
Make your subclasses behave like their base classes without breaking anyone’s expectations when they call the same methods.
This implementation violates the Liskov Substitution Principle because you can't seamlessly replace instances of Rectangle with their Square counterparts.
Imagine someone expects a rectangle object in their code. Naturally, they would assume that it exhibits the behavior of a rectangle, including separate width and height attributes. Unfortunately, the Square class in your codebase violates this assumption by altering the expected behavior defined by the object's interface.
To apply the Liskov Substitution Principle, introduce a base Shape class and make both Rectangle and Square inherit from it:
class Rectangle
def __init__(self, width, height):
self.width = width
self.height = height
def calculate_area(self):
return self.width * self.height:
class Square(Rectangle)
def __init__(self, side):
super().__init__(side, side)
def __setattr__(self, key, value):
super().__setattr__(key, value)
if key in ("width", "height"):
self.__dict__["width"] = value
self.__dict__["height"] = value:Introducing a common base class (Shape), ensures that objects of different subclasses can be seamlessly interchanged wherever the superclass is expected. Both Rectangle and Square are now siblings, each with their own set of attributes, initializer methods, and potentially more separate behaviors. The only shared aspect between them is the ability to calculate their respective areas
from abc import ABC, abstractmethod
class Shape(ABC):
@abstractmethod
def calculate_area(self):
pass
class Rectangle(Shape):
def __init__(self, width, height):
self.width = width
self.height = height
def calculate_area(self):
return self.width * self.height
class Square(Shape):
def __init__(self, side):
self.side = side
def calculate_area(self):
return self.side ** 2dWith this implementation in place, you can use the Shape type interchangeably with its Square and Rectangle subtypes when you only care about their common behavior:
from shapes_lsp import Rectangle, Square
def get_total_area(shapes):
return sum(shape.calculate_area() for shape in shapes)
get_total_area([Rectangle(10, 5), Square(5)])
75Three Violation of LSK Principle:
1. Violating the Contract: Derived classes should not violate the contracts defined by the base class. If a derived class modifies or ignores the requirements specified by the base class, it can lead to inconsistencies and unexpected behaviors.
Every Bird subclass should be able to use the methods of the abstract Bird class.
class Bird:
def fly(self):
pass
class Ostrich(Bird):
def fly(self):
raise NotImplementedError("Ostriches cannot fly!")
bird = Bird()
bird.fly() # Output: (no implementation)
ostrich = Ostrich()
ostrich.fly() # Raises NotImplementedErrorA better solution is to further abstract the method from "fly" to "move," allowing the Ostrich to run when move method is called, and the other birds (ducks) can fly
2. Overriding Essential Behavior: Overriding crucial methods in a way that changes the fundamental behavior defined by the base class can break the LSP. Derived classes should extend or specialize the behavior rather than completely altering it.
class Vehicle:
def start_engine(self):
print("Engine started.")
class ElectricVehicle(Vehicle):
def start_engine(self):
print("Engine cannot be started for an electric vehicle.")
vehicle = Vehicle()
vehicle.start_engine() # Output: Engine started.
electric_vehicle = ElectricVehicle()
electric_vehicle.start_engine() # Output: Engine cannot be started for an electric vehicle.The solutions is to change method name from "start_engine" to "start," since electric and gas vehicles both have to start.
3. Tight Coupling with Implementation Details: Relying heavily on implementation details of derived classes in client code can lead to tight coupling and hinder the flexibility of the LSP. Aim for loose coupling and focus on interacting with objects through their defined interfaces.
class DatabaseConnector:
def connect(self):
pass
class MySQLConnector(DatabaseConnector):
def connect(self):
print("Connecting to MySQL database...")
class PostgreSQLConnector(DatabaseConnector):
def connect(self):
print("Connecting to PostgreSQL database...")
# Tight coupling with concrete class instantiation
connector = MySQLConnector() # Specific to MySQL
connector.connect() # Output: Connecting to MySQL database...In this example, the client code tightly couples with the concrete class MySQLConnector when instantiating the connector object. This direct dependency on the specific class limits the flexibility to switch to other database connectors, such as PostgreSQLConnector. To follow the Liskov Substitution Principle, it is better to interact with objects through their common base class interface (DatabaseConnector in this case) and use polymorphism to instantiate objects based on runtime configuration or user input. The following fixes the issue:
class DatabaseConnector:
def connect(self):
pass
class MySQLConnector(DatabaseConnector):
def connect(self):
print("Connecting to MySQL database...")
class PostgreSQLConnector(DatabaseConnector):
def connect(self):
print("Connecting to PostgreSQL database...")
# Dependency injection with a generic database connector
def use_database_connector(connector):
connector.connect()
# Usage example
if __name__ == "__main__":
mysql_connector = MySQLConnector()
postgresql_connector = PostgreSQLConnector()
use_database_connector(mysql_connector) # Output: Connecting to MySQL database...
use_database_connector(postgresql_connector) # Output: Connecting to PostgreSQL database...
Interface Segregation Principle (ICP)

The Interface Segregation Principle revolves around the idea that clients should not be forced to rely on methods they do not use. To achieve this, the principle suggests creating specific interfaces or classes tailored to the needs of individual clients.
In this example, the base class Printer defines an interface that its subclasses are required to implement. However, the OldPrinter subclass doesn't utilize the fax() and scan() methods because it lacks support for these functionalities.
Unfortunately, this design violates the ISP as it forces OldPrinter to expose an interface that it neither implements nor requires.
from abc import ABC, abstractmetho
class Printer(ABC):
@abstractmethod
def print(self, document):
pass
@abstractmethod
def fax(self, document):
pass
@abstractmethod
def scan(self, document):
pass
class OldPrinter(Printer):
def print(self, document):
print(f"Printing {document} in black and white...")
def fax(self, document):
raise NotImplementedError("Fax functionality not supported")
def scan(self, document):
raise NotImplementedError("Scan functionality not supported")
class ModernPrinter(Printer):
def print(self, document):
print(f"Printing {document} in color...")
def fax(self, document):
print(f"Faxing {document}...")
def scan(self, document):
print(f"Scanning {document}...")dIn this revised design, the base classes—Printer, Fax, and Scanner—provide distinct interfaces, each responsible for a single functionality. The OldPrinter class only inherits the Printer interface, ensuring that it doesn't have any unused methods. On the other hand, the NewPrinter class inherits from all the interfaces, incorporating the complete set of functionalities. This segregation of the Printer interface enables the creation of various machines with different combinations of functionalities, enhancing flexibility and extensibility.
from abc import ABC, abstractmetho
class Printer(ABC):
@abstractmethod
def print(self, document):
pass
class Fax(ABC):
@abstractmethod
def fax(self, document):
pass
class Scanner(ABC):
@abstractmethod
def scan(self, document):
pass
class OldPrinter(Printer):
def print(self, document):
print(f"Printing {document} in black and white...")
class NewPrinter(Printer, Fax, Scanner):
def print(self, document):
print(f"Printing {document} in color...")
def fax(self, document):
print(f"Faxing {document}...")
def scan(self, document):
print(f"Scanning {document}...")dDependency Inversion Principle (DIP)

The Dependency Inversion Principle focuses on managing dependencies between classes. It states that
- Dependencies should be based on abstractions rather than concrete implementations.
- Abstractions should not rely on implementation details; instead, details should depend on abstractions.
Without dependency injection, there is no dependency inversion
class PaymentProcessor
def process_payment(self, payment):
if payment.method == 'credit_card':
self.charge_credit_card(payment)
elif payment.method == 'paypal':
self.process_paypal_payment(payment)
def charge_credit_card(self, payment):
# Charge credit card
def process_paypal_payment(self, payment):
# Process PayPal paymentIn this updated code, we introduced the PaymentMethod abstract base class, which declares the process_payment() method. The PaymentProcessor class now depends on the PaymentMethod abstraction through its constructor, rather than directly handling the payment logic. The specific payment methods, such as CreditCardPayment and PayPalPayment, implement the PaymentMethod interface and provide their own implementation for the process_payment() method.
By following this structure, the PaymentProcessor class is decoupled from the specific payment methods, and it depends on the PaymentMethod abstraction. This design allows for greater flexibility and easier extensibility, as new payment methods can be added by creating new classes that implement the PaymentMethod interface without modifying the PaymentProcessor class.
from abc import ABC, abstractmethod
class PaymentMethod(ABC):
@abstractmethod
def process_payment(self, payment):
pass
class PaymentProcessor:
def __init__(self, payment_method):
self.payment_method = payment_method
def process_payment(self, payment):
self.payment_method.process_payment(payment)
class CreditCardPayment(PaymentMethod):
def process_payment(self, payment):
# Code to charge credit card
class PayPalPayment(PaymentMethod):
def process_payment(self, payment):
# Code to process PayPal payment Composition Over Inheritance:
Prefer composition (building objects by assembling smaller, reusable components) over inheritance (creating new classes by extending existing ones). This approach leads to more flexible and maintainable code.
- Inheritance reduces encapsulation: we want our classes and modules to be loosely coupled to the rest of the codebase.
- A child class, instead, is strongly coupled to its parent. When a parent changes, the change will ripple through all of its children and might break the codebase.
- Testability: Reduced encapsulation results in classes being harder to test.
Composition involves using other classes to build more complex classes, there is no parent/child relationship exists in this case. Objects are composed of other objects, through a has-a relationship, not a belongs-to relationship. This means that we can combine other objects to reach the behavior we would like, thus avoid the subclasses explosion problem. In Python, we can leverage a couple of mechanisms to achieve composition.
Use Inheritance sparingly. Abstract Base Class or Protocol are good examples of clean inheritance.
Make Classes Data-Oriented or Behavior-Oriented
Use @dataclass for data-oriented classes, and consider just having a separate module with functions for Behavior-Oriented classes
Q and A
Here are some questions that interviewers may ask to test your basic knowledge of object oriented design principles.
What is a...
-
Class:
- A class is a fundamental building block in object-oriented programming.
- It serves as a blueprint for defining objects in software, containing properties and methods.
- OOP allows for one class to inherit from another, facilitating code reuse.
-
Properties and Methods:
- Properties are the attributes (nouns) of a class, defining characteristics like color, size, etc.
- Methods are the behaviors (verbs) of a class, defining actions like fly(), eat(), etc.
-
Inheritance:
- Inheritance allows a child class to use the methods and properties of a parent class.
- Child classes inherit behavior from parent classes, facilitating code reuse and promoting a hierarchical structure.
- For example, a Bird class may inherit methods like eat() and sleep() from a parent Animal class, as birds are a type of animal.
-
Hierarchy Building:
- Inheritance allows for the creation of a hierarchy of classes, mirroring real-world relationships.
- It simulates how objects relate to each other through an IS A relationship.
-
Understanding IS A Relationship:
- The goal of inheritance is not just to inherit methods but to adhere to the IS A relationship rule.
- It ensures that subclasses represent specialized versions of their superclass and are related in a meaningful way.
-
Avoiding Poor Design:
- Inheritance should not be used indiscriminately for method reuse.
- For example, a Bird class should not inherit from a Vehicle class solely to use the move() method. This violates the IS A relationship principle and leads to poor design.
-
Key Principle:
- The IS A relationship is crucial for forming class hierarchies and ensuring proper code reuse where it makes sense.
- Well-designed applications leverage inheritance to promote code reuse in a meaningful and logical manner.
-
-
Public vs. Private Methods/Properties:
- Public methods and properties are accessible from external classes, while private methods and properties are only accessible within the class itself.
- Private members cannot be inherited by child classes.
- Inner nested classes within the same class definition have access to private members.
-
Class Constructor:
- A constructor is a method used to instantiate an instance of a class.
- It typically has the same name as the class and initializes specific properties.
- Overloaded constructors allow for multiple constructor definitions with different parameters.
-
Overloaded Methods:
- Overloaded methods have the same name but a different set of parameters.
- The order of parameters matters, and parameters must have different data types to avoid compilation errors.
-
Abstract Class:
- An abstract class cannot be instantiated but can be inherited.
- It contains abstract methods that must be implemented by its child classes.
- Abstract methods are declared without implementation and must be implemented by subclasses.
-
Instantiation:
- Instantiation refers to the creation of an instance (object) of a class.
- It occurs when the class constructor method is called, providing the object with properties and methods defined in the class blueprint.
-
Passing Parameters:
- Passing parameters by value allows methods to access only the parameter's value, not the variable itself.
- Passing parameters by reference passes a pointer to the variable, allowing methods to modify the original variable.
-
Method Overriding:
- Method overriding occurs when a subclass provides its own implementation for a method inherited from a superclass.
- It allows for customizing the behavior of inherited methods in child classes.
-
Exception Handling:
- Exception handling is a process used to handle errors that occur during program execution.
- It allows for graceful error handling, preventing the application from crashing and providing users with feedback on how to proceed.
-
"self" Object:
- The "self" reference refers to the current instance of the object within a class.
- It is used to access instance variables and methods within the class.
-
Static Methods:
- Static methods exist independently of class instances and do not have access to instance variables.
- They are useful for defining utility functions that do not require access to instance-specific data.
When to use functional vs object oriented solutions?
- Functions are action based, and classes are state based
- Functions easier to write unit tests
- object oriented solution is better for real world simulation, or needing to keep states
What are dunder methods?
Design a Parking Lot
Starting an object-oriented design interview for a parking lot scenario involves several key steps to ensure a structured and thorough approach. Here's a suggested outline:
-
Clarify Requirements:
- Begin by asking clarifying questions to fully understand the requirements and constraints of the parking lot system. This may include:
- The size and capacity of the parking lot.
- Types of vehicles allowed (e.g., cars, motorcycles, trucks).
- Parking rules and regulations (e.g., reserved spaces, handicapped spots).
- Payment methods and pricing models.
- Operational considerations (e.g., entry/exit points, security measures).
- Any additional features or functionalities required.
- Begin by asking clarifying questions to fully understand the requirements and constraints of the parking lot system. This may include:
-
Identify Objects and Responsibilities:
- Based on the requirements gathered, identify the main objects and their responsibilities within the parking lot system. This may include:
- ParkingLot: Representing the parking lot itself.
- Vehicle: Representing different types of vehicles.
- ParkingSpace: Representing individual parking spaces.
- Ticket: Representing parking tickets issued to vehicles.
- Entrance/Exit: Representing entry and exit points.
- PaymentSystem: Handling payment processing.
- SecuritySystem: Managing security measures (e.g., surveillance).
- Define the attributes and behaviors (methods) of each object.
- Based on the requirements gathered, identify the main objects and their responsibilities within the parking lot system. This may include:
-
Define Relationships:
- Establish relationships between the identified objects. For example:
- ParkingLot has ParkingSpaces and Entrance/Exit points.
- Vehicle occupies ParkingSpace(s) and obtains Ticket(s).
- PaymentSystem interacts with Ticket(s) to process payments.
- SecuritySystem monitors ParkingLot and Entrance/Exit points.
- Determine the multiplicity and cardinality of relationships (e.g., one-to-one, one-to-many).
- Establish relationships between the identified objects. For example:
-
Design Class Diagram:
- Create a class diagram to visually represent the relationships between objects. Use UML notation to depict classes, attributes, methods, and associations.
- Ensure that the class diagram accurately reflects the identified objects and their interactions.
-
Consider Design Patterns:
- Evaluate whether any design patterns (e.g., Factory, Singleton, Strategy) are applicable to optimize the design and address specific requirements.
- Integrate relevant design patterns into the class diagram as needed.
-
Discuss Trade-offs and Scalability:
- Discuss any trade-offs involved in the design decisions made, such as performance vs. simplicity, flexibility vs. efficiency, etc.
- Consider how the design can accommodate future scalability and extensibility requirements.
-
Validate and Iterate:
- Validate the design with the interviewer, ensuring that it aligns with the requirements and addresses all key aspects of the parking lot system.
- Be prepared to iterate on the design based on feedback and further discussions with the interviewer.
By following this structured approach, you can effectively tackle an object-oriented design interview question for designing a parking lot system, demonstrating your ability to analyze requirements, identify objects, define relationships, and create a well-structured design.
Concepts
- Objects are representation of real world entities
- Data/attributes
- Behavior
- Classes are "classified" as blueprints, template, or cookie cutter of Objects
- When creating objects from a class, it is instantiated
Noun Verb Technique