C++
Pointers, Arrays, and References
In C++, arrays are used to store a fixed-size sequence of elements of the same data type. To create an array in C++, you need to follow certain requirements:
Alternatives to Pointer:
Looking at Pointer heavy code is difficult to determine intent of the programmer. Unless you are writing libraries you should almost never have to worry about manual allocation and deallocation. Memory for objects should be allocated in a constructor, and then deallocated in the destructor. Use containers such as std::vector (for resizable arrays) and std::array (for fixed size arrays) instead of the naive array type. They are essentially zero-overhead, take care of all allocation, reallocation ( in the case of vector) and deallocation, and provide a fairly comprehensive interface.
Consider using the Standard Library before using pointers for general Software Engineering. In modern C++ (11 and later)
- To hold a collection of values, consider a container, such as vector, set, map, unordered_map, or array
- To hold a string of characters, consider String
- To point to an object you own (i.e., must delete) use unique_ptr, or shared_ptr
- To point to a continguous sequence of elements that you dont own, use span
- To systematically avoid dereferencing a null pointer, use not_null
Pointers are not use in C-style Shader languages like GLSL/HLSL, but is critical to understand in Vulkan, and to lesser degree OpenGL.
Vectors
Variables in Memory
The computer has finite resources for "remembering" things. So, you can't just keep asking it to remember data without at some point also telling it that it's ok to forget the data. Otherwise, at some point it will be completely full of stuff you told it to remember, and it just won't be able to remember anything new, even if most of that data isn't even accessible through variables anymore (this is called a memory leak). The duration of time between remembering the data (allocating space for it in memory) and telling your computer that it can forget the data (freeing/deallocating the space) is called the lifetime of the memory.
Date Lifetime
Three categories for the lifetime of memory in order to understand how variables are stored:
-
Global: This memory is around for the entire lifetime of your program. Generally this is a fixed amount of space that is allocated right when the program starts, and it cannot grow.
-
Local: The memory is allocated for you when entering a particular portion of the program, and automatically freed for you when exiting that part. This is denoted with curly braces
{}, so it could be the scope of an...-
-
entire function
-
ifstatement -
loop
-
Anything inside curly braces
{}
-
Inside a block scope have limited lifetime and visibility. Outside that block, those variables no longer exist.
-
-
Dynamic: This memory has a lifetime which is unknown at the time of allocation. The program explicitly asks for a specific size of memory, and then that memory lives until the program explicitly says the memory is no longer needed.
-
In C++, this is done via
mallocornewand then the correspondingfreeordeletecalls.Many languages (like Python, but not C++) uses a "Garbage Collector" takes control of the lifetime of dynamically allocated memory. You only ever call
newand then there is a background algorithm always running which tracks which memory is still being used and frees it for you. This avoids most causes of memory leaks, but it cost performance. C++ puts the burden on the programmer to do it manually (and correctly) to be more performant.
-
Static, Stack, and Heap
Stack, heap, or in static/global memory are stored in RAM (Random Access Memory).
They occupy different regions of RAM based on their storage duration and allocation mechanism.
Memory Layout Representation
|-----------------------------------|  <- High Memory Address (ends at 0xFFFFFFFFFFFFFFFF)
|        Stack                      |  <--- Grows Downwards
|  (Local variables, function calls)|
|-----------------------------------|
|        Unused Space               |  <--- Space available for future allocation
|-----------------------------------|
|        Heap                       |  <--- Grows Upwards
|  (Dynamically allocated memory)   |
|-----------------------------------|  <- Low Memory Address (starts at 0x0000000000000000 / null pointer)
|        Text Segment               |  <--- Program instructions / Compiled Sourcecode / Machine Code in 0 & 1
|-----------------------------------|
|        Initialized Data           |  <--- Global and static variables (initialized)
|-----------------------------------|
|        Uninitialized Data (.bss)  |  <--- Global/static variables (uninitialized)
|-----------------------------------|
Directionality Matters: The upward growth of the heap and downward growth of the stack is crucial for efficient memory utilization, error detection, performance, and cache optimization.
Safety Mechanism: This design allows for better control over memory usage and helps prevent memory-related errors, making it an important aspect of system and application architecture.
Memory Addresses
Within RAM there is Memory addresses, which are fundamental to how data is accessed and manipulated in programming. They allow the CPU to locate and retrieve data stored in RAM, making them essential for efficient computation and memory management.
In computer systems, a memory address is a unique identifier for a location in memory where data is stored. Whether a memory address is high or low does not affect speed, but rather designates location. Memory addresses are typically represented in hexadecimal format. Here are a few examples:
-
Hexadecimal Format:
- 32 bit system:
0x004000000x7FFF1234
- 64 bit system:
0x00007FFDCAFE1234
- 32 bit system:
-
Example Usage:
#include <iostream>

int main() {
    int x = 42;  // Declare an integer variable
    std::cout << "Memory address of x: " << &x << std::endl;  // Print the memory address of x
    return 0;
}
Memory address of x: 0x7fffc3a1a4b8In C++ coding, the Static, Heap, and Stack are corelated with their associated variables, which are stored through memory addresses.
Variables in Memory
variable - refers to a named memory location that can hold data that might change during program execution.
- basic variable - Any entity that holds a value and has a type (like
int,float,char, etc.)
int number; // Declaring an `int` variable named `number`int number = 42; // Declaring and initializing `number` with 42.- complex variable - entities such as pointers, arrays, and objects of a class
When you declare a variable, the system allocates memory to store the value, and that memory is identified by the variable name. The compiler (GCC, Clang, etc) maps these names to actual memory addresses when the program is compiled and executed.
Depending on the context (stack, heap, or static), this memory may reside in different regions:
1. Static Variables
Storage Duration:
-
-
- Static Storage Duration: The variable is allocated when the program starts and deallocated when the program ends, persisting for the entire lifetime of the program.
-
Scope:
-
-
- Global Static: When declared outside of functions or classes, static variables have file scope (internal linkage). They are visible only in the file or translation unit they are defined in.
- Local Static: When declared inside a function, static variables have function scope, but their value persists across function calls.
-
Memory Location:
-
-
- Data Segment (either
.bssfor uninitialized or.datafor initialized variables) of the program’s memory.
- Data Segment (either
-
Initialization:
-
-
- Global Static Variables: Automatically initialized to zero (or
nullptrfor pointers) if not explicitly initialized. - Local Static Variables: Initialized the first time the code execution passes through their declaration (e.g., in a function). If not explicitly initialized, they default to zero.
- Global Static Variables: Automatically initialized to zero (or
-
When to Use:
-
-
- Need for a variable to persist across function calls or to exist throughout the lifetime of the program.
- Global configuration data or constants that should be shared across the entire program but should not be modified frequently.
- To preserve the state of a local variable in a function between calls (like a counter)
-
Pros:
-
-
- No need for manual memory management.
- Efficient for persisting values across function calls or through the program's lifetime.
-
Cons:
-
-
- Overuse of global static variables can lead to tight coupling and difficult debugging.
- Can increase memory usage if used excessively, as memory is allocated for the entire program duration.
-
#include <iostream>

static int globalStatic = 42; // Static global variable (file scope)

void function() {
    static int localStatic = 10; // Static local variable (function scope)
    localStatic++;
    std::cout << "Local Static: " << localStatic << std::endl;
}

int main() {
    function(); // Prints 11
    function(); // Prints 12
    return 0;
}
2. Heap (Free Store) Variables
Storage Duration:
-
-
- Dynamic Storage Duration: Variables on the heap are dynamically allocated using
new(ormallocin C) and persist until they are explicitly deallocated usingdelete(orfree).
- Dynamic Storage Duration: Variables on the heap are dynamically allocated using
-
Scope:
-
-
- The scope of a pointer to a heap-allocated variable depends on where the pointer is declared, but the memory allocated on the heap persists independently of the pointer’s scope until manually freed.
-
Memory Location:
-
-
- Heap is managed dynamically.
-
Initialization:
-
-
- Non-initialized heap variables are left with indeterminate values unless you explicitly initialize them.
- Heap-allocated objects are initialized through constructors if they are class objects.
-
When to Use:
-
-
- When you don’t know the size of the data at compile time (e.g., user input, file data, dynamically sized arrays).
- When objects need to persist beyond the scope of the function that created them.
- For large objects that might exceed the limited size of the stack (e.g., large arrays, buffers, or structures).
- When you need to allocate memory for complex data structures (like linked lists, trees, or graphs) that can grow or shrink dynamically.
-
Pros:
-
-
- Provides flexibility to allocate memory at runtime based on dynamic needs.
- Can allocate larger chunks of memory that may not fit in the stack.
-
Cons:
-
-
- Manual memory management is required (you must use
newto allocate anddeleteto free). - Potential for memory leaks if memory is not properly deallocated.
- Slower than stack memory due to the overhead of dynamic memory management (allocation and deallocation).
- Manual memory management is required (you must use
-
#include <iostream>

int main() {
    int* heapVar = new int(5); // Dynamically allocated on the heap
    std::cout << "Heap Variable: " << *heapVar << std::endl;

    delete heapVar; // Must be manually deallocated to avoid memory leak
    return 0;
}
3. Stack Variables (Automatic Storage Duration)
Stack will pretty much never exhaust it unless
-
-
- you define absurdly large objects on the stack (e.g. an array of milions of objects)
- you recurse too deeply (usually as a result of a bug of infinite recursion or unnecessarily large stack frame size)
-
Unique to stack is the stack frame, which is a structured block of memory on the stack that is created when a function is called.
It holds:
-
-
- Local variables
- Function parameters
- Return address (where to return after the function call)
- Saved registers and other context information
-
-
- Lifetime: The stack frame is automatically created when the function is invoked and destroyed when the function exits.
- No "Heap Frames" or "Static Frames": Heap memory is more flexible and does not use frames. Instead, it uses blocks of memory allocated as needed, allowing for dynamic data structures and sizes.
- Example: https://caseymuratori.com/blog_0015
Storage Duration:
-
-
- Automatic Storage Duration: Variables declared on the stack (inside a function or block scope) are automatically allocated when their block of code is entered and deallocated when the block is exited.
-
Scope:
-
-
- Stack variables have local scope, which means they are visible only inside the function or block in which they are declared.
-
Memory Location:
-
-
- Stack, which is a part of memory where automatic variables are stored.
-
Initialization:
-
-
- Uninitialized primitive types (like
int,char, etc.) in C++ have indeterminate values. - Local variables of class types are initialized through constructors.
- Always good practice to initialize stack variables to avoid undefined behavior.
- Uninitialized primitive types (like
-
When to Use:
-
-
- For simple, small variables that are local to a function or block.
- When the size of the variable is known at compile time.
- When you need automatic memory management—stack variables are automatically deallocated when they go out of scope, making them safer and faster.
- When short-lived variables are sufficient (i.e., variables that don’t need to persist beyond their block or function scope).
-
Pros:
-
-
- Automatic memory management: No need to explicitly free memory; variables are automatically destroyed when they go out of scope.
- Fast allocation and deallocation compared to heap allocation.
- Safer in terms of preventing memory leaks, as memory management is handled by the program.
-
Cons:
-
-
- Limited by stack size: Large variables can cause stack overflow, especially with recursion or large data structures.
- Variables are destroyed as soon as they go out of scope, so they can't persist beyond their function or block.
-
#include <iostream>

void function() {
    int stackVar = 10;  // Allocated on the stack
    std::cout << "Stack Variable: " << stackVar << std::endl;
} // 'stackVar' is destroyed here when function exits

int main() {
    function();
    return 0;
}
RAII and Initializer Lists
Resource Acquisition Is Initialization
RAII stands for Resource Acquisition Is Initialization. It’s a programming idiom in C++ used to manage resource lifetimes, such as memory, file handles, or mutex locks. RAII ensures that resources are properly acquired and released by tying their lifetimes to the scope of an object. When the object goes out of scope, its destructor is called, and the resource is released.
Key Concepts:
- Resource Acquisition: Resources like memory or file handles are acquired during object construction.
- Initialization: Initialization happens in the object's constructor, ensuring that the object is fully initialized before use.
- Scope-bound Resource Management: The destructor is called automatically when the object goes out of scope, releasing the resource.
Example:
Consider a simple RAII class that manages a file:
#include <iostream>
#include <fstream>

class FileRAII {
public:
    // Constructor opens a file resource
    FileRAII(const std::string& fileName) {
        file.open(fileName);
        if (!file.is_open()) {
            throw std::runtime_error("Could not open file");
        }
    }

    // Destructor releases the file resource
    ~FileRAII() {
        if (file.is_open()) {
            file.close();
        }
    }

    // Function to write data to the file
    void write(const std::string& data) {
        if (file.is_open()) {
            file << data << std::endl;
        }
    }

private:
    std::ofstream file;  // File resource managed by this class
};

int main() {
    try {
        FileRAII file("example.txt");
        file.write("Hello, RAII!");
        // File is automatically closed when file goes out of scope
    }
    catch (const std::exception& e) {
        std::cerr << e.what() << std::endl;
    }

    return 0;
}
Explanation:
- Constructor:
FileRAII(const std::string& fileName)- Opens a file and acquires the resource. - Destructor:
~FileRAII()- Closes the file when theFileRAIIobject goes out of scope, ensuring that the resource is properly released. - RAII Usage: When
FileRAIIis created in themain()function, it manages the file resource. Once the function exits, the destructor is called, and the file is closed automatically.
This pattern ensures that resources like files are not left open, memory is not leaked, and mutexes are always released, making C++ code more robust and exception-safe
Initializer Lists
In C++, initializer lists provide a way to initialize the data members of a class directly in the constructor. They allow you to specify initial values for class members and base classes before the constructor’s body executes, improving performance and readability.
Why Use Initializer Lists?
- Performance: Directly initializing members in an initializer list is often more efficient than assigning values in the constructor body, because it avoids creating temporary objects.
- Initialization of
constand reference members:constand reference members must be initialized at the time of creation, which can only be done using initializer lists. - Initialization of base classes: Initializer lists allow you to initialize base classes before the derived class constructor body executes.
- Control Over Member Initialization Order: Members are initialized in the order of their declaration in the class, not the order they appear in the initializer list.
Example without
#include <iostream>

class Rectangle {
public:
    // Constructor without initializer list
    Rectangle(int w, int h) {
        width = w;  // Assignment inside constructor body
        height = h; // Assignment inside constructor body
    }

    void display() const {
        std::cout << "Width: " << width << ", Height: " << height << std::endl;
    }

private:
    int width;
    int height;
};

int main() {
    Rectangle rect(5, 10); // Create Rectangle object
    rect.display(); // Output: Width: 5, Height: 10
    return 0;
}
Example with
#include <iostream>

class Rectangle {
public:
    // Constructor with initializer list
    Rectangle(int w, int h) : width(w), height(h) { }

    void display() const {
        std::cout << "Width: " << width << ", Height: " << height << std::endl;
    }

private:
    int width;
    int height;
};

int main() {
    Rectangle rect(5, 10); // Create Rectangle object
    rect.display(); // Output: Width: 5, Height: 10
    return 0;
}
Conclusion:
- Without Initializer Lists: Inefficient, and sometimes not possible with
constor reference members. - With Initializer Lists: More efficient, clear, and required for initializing certain member types.
Makefile
Compiling and Linking
Compiling and linking are two critical steps in the process of turning human-readable source code into an executable program. Here's an overview of what each step involves:
Compilation
Compilation is the process of transforming source code (written in languages like C, C++, etc.) into machine code or an intermediate format like object code. The compiler reads your source code and checks it for errors, syntax correctness, and other issues. If everything is correct, it translates the code into machine-level instructions that the computer's CPU can understand.
For a C program with the following source code file main.c:
#include <stdio.h>

int main() {
    printf("Hello, world!\n");
    return 0;
}
The compiler (gcc, clang, etc.) will transform main.c into an object file (main.o), which contains compiled code but isn't yet executable.
- Compilers translate high-level code into lower-level object code.
- Object files are incomplete and need linking to be fully functional
Linking
Linking is the process that combines object files and libraries into a complete, runnable program. This step is necessary because most programs are made up of multiple parts, often spread across several files. Additionally, programs rely on external code from libraries (like the C standard library for functions like printf).
There are two types of linking:
- Static linking: The linker copies the required code from libraries into the executable itself.
- Dynamic linking: The program is linked to shared libraries (e.g.,
.soor.dllfiles) that are loaded at runtime. This reduces the executable size but requires the shared libraries to be available when the program runs.
The output of the linking step is an executable file (e.g., a.out on Unix-based systems or my_program.exe on Windows).
Suppose main.o needs to be linked with a standard library like libc to resolve the printf function. The linker combines main.o with the necessary libraries, producing an executable my_program.
- Linkers resolve references to external symbols (e.g., functions or variables) that are not defined within the same object file.
- The linker combines the necessary pieces to create a final executable program.
Here’s a breakdown of how it works in sequence:
1. Compilation
-
Step 1: Each source file is independently compiled into an object file.
- The source code (e.g.,
.c,.cppfiles) is translated into machine code by the compiler. - Each source file produces a corresponding object file (e.g.,
.oor.obj). - These object files are still incomplete because they often refer to functions or variables defined in other files or libraries.
- Output: One or more object files (
.o,.obj).
Example:
main.c→main.ofoo.c→foo.o
- The source code (e.g.,
2. Linking
-
Step 2: All the object files, along with any necessary libraries, are linked together to form an executable.
- The linker combines the object files into a complete program, resolving references between them (like calling functions defined in different files).
- It also pulls in any external libraries (such as the standard C library for functions like
printf). - Output: A final executable (e.g.,
my_program,a.out, ormy_program.exe).
Example:
main.o + foo.o + bar.o + standard libraries→my_program
Why Is It a Two-Step Process?
This separation into two steps allows for modular compilation:
- You don't need to recompile all the files every time you make a small change to one file. Only the modified file needs to be recompiled, and then the linker combines the new object file with the existing ones to create the updated program.
- It supports the reuse of precompiled object files or libraries, making the build process faster and more efficient in larger projects.
Why do Makefiles exist?
Makefiles automate this process by managing the compilation and linking of multiple files in large projects.
A Makefile is a special file used by the make utility to automate the build process of software projects. It defines a set of rules that dictate how to compile and link programs. When working on a project with multiple source files and dependencies, a Makefile can greatly simplify the build process by specifying:
-
Targets: These are typically files that you want to generate, like executables or object files. A target can also represent a task, like running tests or cleaning up compiled files.
-
Dependencies: Files or targets that must be up-to-date before a target can be built. For example, a
.cfile depends on a corresponding.hheader file. -
Commands: Shell commands to be executed to build the target. These typically include commands like
gccfor compiling org++for linking.
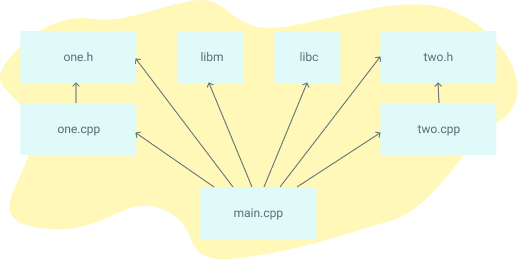
Here's an example dependency graph that you might build with Make. If any file's dependencies changes, then the file will get recompiled:
Interpreted languages like Python, Ruby, and raw Javascript don't require an analogue to Makefiles. The goal of Makefiles is to compile whatever files need to be compiled, based on what files have changed. But when files in interpreted languages change, nothing needs to get recompiled. When the program runs, the most recent version of the file is used. However, it can automate tasks in other environments, like managing dependencies in a Python or JavaScript project.
Make file Basic Structure:
targets: dependencies
	command
	command
	command
Example Make file for Simple C++ project
# Compiler and flags
CC = gcc
CFLAGS = -Wall -g

# Target program
TARGET = my_program

# Source files
SRCS = main.c foo.c bar.c

# Object files (generated from source files)
OBJS = $(SRCS:.c=.o)

# Default target
all: $(TARGET)

# Rule to build the target program
$(TARGET): $(OBJS)
    $(CC) $(CFLAGS) -o $(TARGET) $(OBJS)

# Rule to build object files from source files
%.o: %.c
    $(CC) $(CFLAGS) -c $<

# Clean rule to remove generated files
clean:
    rm -f $(OBJS) $(TARGET)
Key Points:
$(CC)and$(CFLAGS): Variables for the compiler and flags.$<and$@: Special automatic variables where$<refers to the first dependency, and$@refers to the target.cleantarget: Commonly used to delete object files and executables after building.
Why Use Makefiles?
- Efficiency: Only recompiles files that have changed.
- Automation: Simplifies repetitive tasks like compilation, linking, or testing.
- Portability: Works across different systems without needing to write custom build scripts.
The Essence of Make
hello:
	echo "Hello, World"
echo "This line will print if the file hello does not exist."- We have one target called
hello - This target has two commands
- This target has no prerequisites
We'll then run make hello. As long as the hello file does not exist, the commands will run. If hello does exist, no commands will run.
It's important to realize that I'm talking about hello as both a target and a file. That's because the two are directly tied together. Typically, when a target is run (aka when the commands of a target are run), the commands will create a file with the same name as the target. In this case, the hello target does not create the hello file.
Let's create a more typical Makefile - one that compiles a single C file. But before we do, make a file called blah.c that has the following contents:
// blah.c
int main() { return 0; }
Then create the Makefile (called Makefile, as always):
blah:
	cc blah.c -o blah
This time, try simply running make. Since there's no target supplied as an argument to the make command, the first target is run. In this case, there's only one target (blah). The first time you run this, blah will be created. The second time, you'll see make: 'blah' is up to date. That's because the blah file already exists. But there's a problem: if we modify blah.c and then run make, nothing gets recompiled.
We solve this by adding a prerequisite:
blah: blah.c
	cc blah.c -o blah
When we run make again, the following set of steps happens:
- The first target is selected, because the first target is the default target
- This has a prerequisite of
blah.c - Make decides if it should run the
blahtarget. It will only run ifblahdoesn't exist, orblah.cis newer thanblah
This last step is critical, and is the essence of make. What it's attempting to do is
- Decide if the prerequisites of
blahhave changed sinceblahwas last compiled. That is, ifblah.cis modified, runningmakeshould recompile the file. - Conversely, if
blah.chas not changed, then it should not be recompiled.
It uses the filesystem timestamps as a proxy to determine if something has changed. File timestamps typically will only change if the files are modified.
SOURCE:
https://makefiletutorial.com/